Generating Code 128C Barcodes in Blazor: A Step-by-Step Guide

Ruslan Dudchenko
Ruslan Dudchenko
22 Nov 2024

7 min read

Introduction

This article delves into the implementation of barcode rendering, focusing specifically on Code 128C, using Blazor and C#. The goal is to generate barcodes entirely within a Blazor application by implementing the encoding algorithm in C#. While this article primarily focuses on Code 128C, the same algorithmic approach can be adapted to render other types of barcodes, making it a versatile solution for various use cases.
Although there are JavaScript libraries and pre-built JS implementations for rendering barcodes, having the ability to generate and render barcodes natively in Blazor using C# provides several advantages. It gives developers complete control over the barcode generation process and eliminates potential delays caused by communication with JavaScript interop. This is especially critical when working in Blazor Hybrid scenarios, such as mobile apps developed with .NET MAUI Blazor, where responsiveness and performance are paramount.

Barcodes, in essence, are machine-readable representations of data that encode information in a series of black and white bars. Code 128C is a high-density barcode format that is optimized for numeric data, encoding two digits per symbol, making it particularly compact and efficient for numerical datasets. This makes it ideal for use in industries like logistics, retail, and inventory management.

How Code 128C is Rendered

The visual rendering of a Code 128C barcode is based on a series of black and white bars of varying widths. These bars are grouped into segments, including a start symbol, a sequence of encoded numbers, a checksum, and a stop symbol. Each segment is converted into a specific pattern of bars, which are precisely defined in the Code 128 specification using a mapping table.
A Code 128C barcode is designed to efficiently encode numeric data, making it both compact and machine-readable. The input data must consist of numeric characters, which are split into groups of two digits, called two-digit pairs. Each two-digit pair is treated as a single number between 00 and 99. For example, the input “123456” is divided into the pairs [“12”, “34”, “56”], with each pair encoded separately according to the Code 128 specification.
If the input contains an odd number of digits (e.g., “12345”), a leading zero is added to make the total number of digits even. This ensures that every two-digit pair has exactly two characters. In this case, “12345” becomes “012345”, resulting in the pairs [“01”, “23”, “45”].
Each segment in the barcode, whether it represents the start symbol, a two-digit pair, or the checksum, is rendered using 11 narrow bars and spaces (called unit bars). These 11 unit bars are grouped to form 3 black bars and 3 white spaces, creating a clear alternating pattern. The width of each bar (or space) can vary between 1 and 4 narrow units, but the total width of all 11 unit bars in a segment always adheres to the same rules.
Finally, the barcode ends with a unique stop symbol, which differs slightly in its structure by using 13 unit bars and spaces. This alternating pattern of black and white ensures the barcode remains scannable and accurate, even at high densities.

Understanding the Code 128C Algorithm

The Code 128C barcode sequence is a string of zeros and ones representing black and white bars. Each part of the barcode is derived using a predefined Code 128 specification table. Here’s how you can generate the sequence step by step:
    private readonly string[] _arrayCode128Bin = [ 
        "11011001100", "11001101100", "11001100110", "10010011000", "10010001100", "10001001100", "10011001000", "10011000100", "10001100100", "11001001000", "11001000100", 
        "11000100100", "10110011100", "10011011100", "10011001110", "10111001100", "10011101100", "10011100110", "11001110010", "11001011100", "11001001110", "11011100100", 
        "11001110100", "11101101110", "11101001100", "11100101100", "11100100110", "11101100100", "11100110100", "11100110010", "11011011000", "11011000110", "11000110110", 
        "10100011000", "10001011000", "10001000110", "10110001000", "10001101000", "10001100010", "11010001000", "11000101000", "11000100010", "10110111000", "10110001110", 
        "10001101110", "10111011000", "10111000110", "10001110110", "11101110110", "11010001110", "11000101110", "11011101000", "11011100010", "11011101110", "11101011000", 
        "11101000110", "11100010110", "11101101000", "11101100010", "11100011010", "11101111010", "11001000010", "11110001010", "10100110000", "10100001100", "10010110000", 
        "10010000110", "10000101100", "10000100110", "10110010000", "10110000100", "10011010000", "10011000010", "10000110100", "10000110010", "11000010010", "11001010000", 
        "11110111010", "11000010100", "10001111010", "10100111100", "10010111100", "10010011110", "10111100100", "10011110100", "10011110010", "11110100100", "11110010100", 
        "11110010010", "11011011110", "11011110110", "11110110110", "10101111000", "10100011110", "10001011110", "10111101000", "10111100010", "11110101000", "11110100010", 
        "10111011110", "10111101110", "11101011110", "11110101110", "11010000100", "11010010000", "11010011100", "1100011101011", "11010111000"
    ];

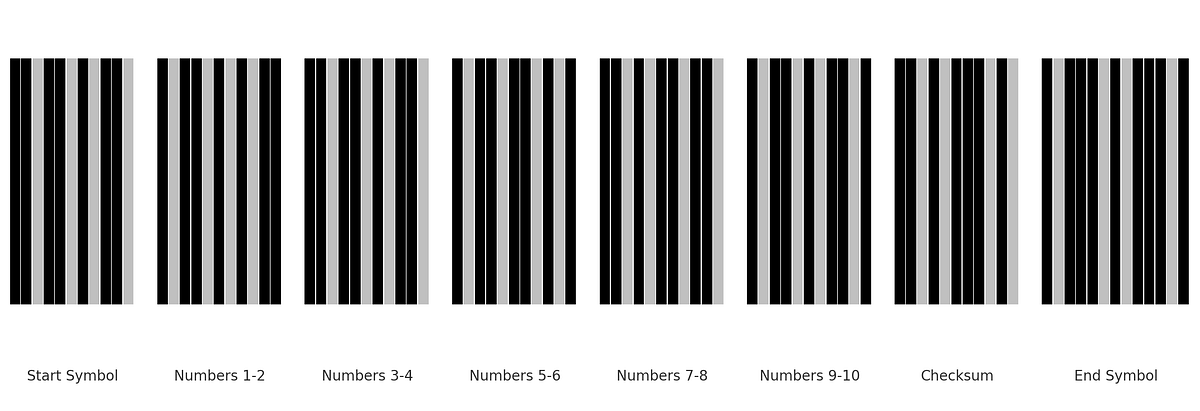
1. Append the Start Symbol

  1. Start by appending the start symbol to the barcode sequence.
2. For Code 128C, the start symbol is always the “Start Code C”, which is located at position 105 in the table.
3. The corresponding bar pattern is taken from the table (e.g., "11010011100").

2. Map Two-Digit Numbers to Table Positions

  1. The input number string is divided into two-digit pairs:
  • For example, "123456" becomes "12", "34", "56".
  • Each two-digit pair is treated as a single number between 00 and 99.
2. This number is used as the index to find the corresponding bar pattern in the table:
  • "12" → Position 12 in the table → Bar sequence "11011001100".
  • "34" → Position 34 in the table → Bar sequence "11100101100".

If the input string has an odd number of digits, a leading 0 is added to make it even. For example:

"12345" → "012345".

3. Calculate the Checksum

The checksum ensures data integrity. It is calculated as follows:
  1. Start with the value of the start symbol (105).
  2. For each two-digit pair, multiply its position (1-based index) by its value:
  • For "12" (value 12) at position 1: 12 × 1 = 12.
  • For "34" (value 34) at position 2: 34 × 2 = 68.
  • For "56" (value 56) at position 3: 56 × 3 = 168.
3. Add these values together and take the result modulo 103:
  • (105 + 12 + 68 + 168) % 103 = 50.

4. Append the Checksum Bar Sequence

  1. Use the calculated checksum value (50) to look up the corresponding bar pattern in the table.
  • Position 50 in the table → Bar sequence "11001110100".
2. Append this bar sequence to the barcode.

5. Append the End Symbol

  1. Append end symbol to the barcode sequence.
This is how barcode sequence generation algorithm is implemented in Blazor application:
public class BarcodeService : IBarcodeService
{
    private readonly string[] _arrayCode128Bin = [ 
        "11011001100", "11001101100", "11001100110", "10010011000", "10010001100", "10001001100", "10011001000", "10011000100", "10001100100", "11001001000", "11001000100", 
        "11000100100", "10110011100", "10011011100", "10011001110", "10111001100", "10011101100", "10011100110", "11001110010", "11001011100", "11001001110", "11011100100", 
        "11001110100", "11101101110", "11101001100", "11100101100", "11100100110", "11101100100", "11100110100", "11100110010", "11011011000", "11011000110", "11000110110", 
        "10100011000", "10001011000", "10001000110", "10110001000", "10001101000", "10001100010", "11010001000", "11000101000", "11000100010", "10110111000", "10110001110", 
        "10001101110", "10111011000", "10111000110", "10001110110", "11101110110", "11010001110", "11000101110", "11011101000", "11011100010", "11011101110", "11101011000", 
        "11101000110", "11100010110", "11101101000", "11101100010", "11100011010", "11101111010", "11001000010", "11110001010", "10100110000", "10100001100", "10010110000", 
        "10010000110", "10000101100", "10000100110", "10110010000", "10110000100", "10011010000", "10011000010", "10000110100", "10000110010", "11000010010", "11001010000", 
        "11110111010", "11000010100", "10001111010", "10100111100", "10010111100", "10010011110", "10111100100", "10011110100", "10011110010", "11110100100", "11110010100", 
        "11110010010", "11011011110", "11011110110", "11110110110", "10101111000", "10100011110", "10001011110", "10111101000", "10111100010", "11110101000", "11110100010", 
        "10111011110", "10111101110", "11101011110", "11110101110", "11010000100", "11010010000", "11010011100", "1100011101011", "11010111000"
    ];

    public string GetBarcode128C(string numberStr)
    {
        if (string.IsNullOrEmpty(numberStr)) return string.Empty;
        if (!numberStr.All(char.IsDigit)) return string.Empty;
        
        if (numberStr.Length % 2 == 1)
            numberStr = $"0{numberStr}";
        
        var startChar = _arrayCode128Bin[105]; // 11010011100
        var endChar = _arrayCode128Bin[106]; // 1100011101011
        
        var barcodeArray = new List<string> { startChar };
        var checkSum = 105; // startChar DEC * 1
        
        for (int i = 0; i < numberStr.Length; i += 2)
        {
            var twoDigitString = numberStr.Substring(i, 2);
            var twoDigitNumber = int.Parse(twoDigitString);

            checkSum += twoDigitNumber * (i / 2 + 1);
            barcodeArray.Add(_arrayCode128Bin[twoDigitNumber]);
        }

        checkSum %= 103;
        barcodeArray.Add(_arrayCode128Bin[checkSum]);
        barcodeArray.Add(endChar);
        
        return string.Join(string.Empty, barcodeArray);
    }
}

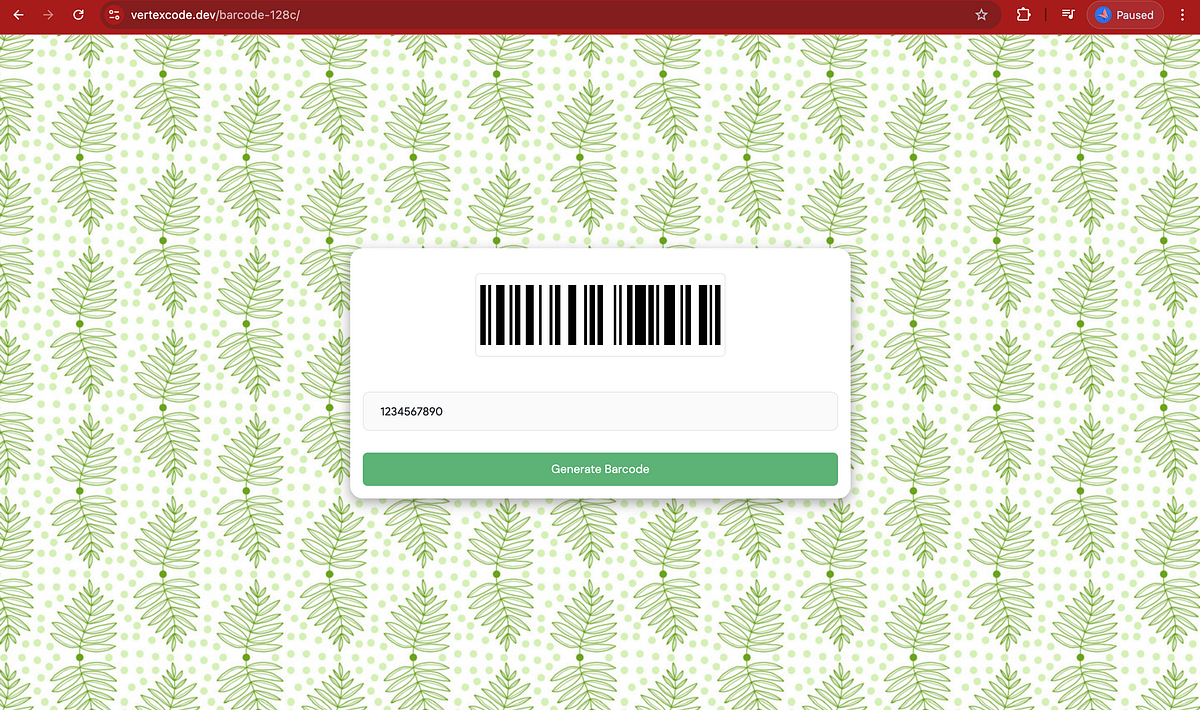
Rendering of Barcode 128c in Blazor

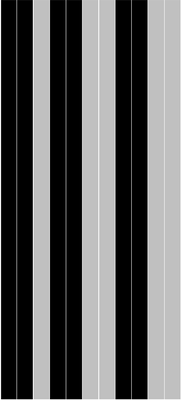
Aliasing problem (detected on MAUI application)

When rendering a Code 128C barcode from its binary sequence (a string of zeros and ones where 1 represents black bars and 0 represents white spaces), it is important to consider how the bars are drawn on the screen. If each individual 0 or 1 is rendered as a separate visual element, you might encounter undesirable gaps or inconsistencies between adjacent bars. This is caused by a phenomenon known as aliasing.

What is Antialiasing?

Antialiasing is a visual effect used to smooth the edges of digital graphics. When adjacent elements, such as the narrow bars in a barcode, are rendered separately, antialiasing can create faint lines or gaps between these elements, making the barcode appear inconsistent. This happens especially when the rendering engine attempts to “blend” the edges of two closely aligned shapes with the background.

Solution: Grouping Zeros and Ones

To avoid this issue, the binary sequence is grouped into consecutive runs of identical symbols (e.g., multiple consecutive 1s or 0s). Each group is then rendered as a single continuous bar. This ensures that the bars appear uniform and eliminates the risk of gaps due to antialiasing.
For example:
  • A binary sequence like "1110001111" would be grouped into:
  • "111" (black bar of width 3)
  • "000" (white space of width 3)
  • "1111" (black bar of width 4).
By grouping, each run of 1s or 0s is rendered as a single block, preserving visual integrity.
<div class="barcode-128с-container">
    @if (!string.IsNullOrEmpty(BarcodeSequence)) {
        var unitWidth = 100.0f / BarcodeSequence.Length;
        var groupedPairs = GroupBySymbolSequence(BarcodeSequence);

        foreach (var pair in groupedPairs)
        {
            <div class="unit-line @(pair.Symbol == '0' ? "white" : "black")" 
                 style="width: @((unitWidth * pair.Count).ToString(CultureInfo.InvariantCulture))%"></div>
        }
    }
</div>
Below you is listing with method that we use for grouping repeating subsequences of ones and zeros.
public partial class Barcode128C
{
    [Parameter] public required string BarcodeSequence { get; set; }
    
    class SequenceGroup
    {
        public char Symbol { get; set; }
        public int Count { get; set; }
    }
    
    private static List<SequenceGroup> GroupBySymbolSequence(string input)
    {
        var result = new List<SequenceGroup>();

        if (string.IsNullOrEmpty(input))
            return result;

        var currentSymbol = input[0];
        var currentCount = 1;

        for (var i = 1; i < input.Length; i++)
        {
            if (input[i] == currentSymbol)
            {
                currentCount++;
            }
            else
            {
                result.Add(new SequenceGroup { Symbol = currentSymbol, Count = currentCount });
                currentSymbol = input[i];
                currentCount = 1;
            }
        }

        result.Add(new SequenceGroup { Symbol = currentSymbol, Count = currentCount });
        return result;
    }
}

Testing and Verifying the Barcode

To ensure the correctness and functionality of the barcode generation process, I have implemented a Blazor app that converts numeric strings into Code 128C barcodes. This application allows users to input a numeric string and generates the corresponding barcode sequence as a visual output. Below is a screenshot of the app in action, demonstrating the process of converting a number into a Code 128C barcode.

Try it Yourself

You can navigate to the app and test the barcode generation by following this link. Simply enter a numeric string, submit and the app will generate the corresponding barcode.

Verifying Results

To verify the generated barcode, I took screenshot of the generated barcode image and uploaded it to an online barcode recognition service to check its validity and ensure it matches the input data.
We hope this article proves helpful for those looking to understand and implement Code 128C barcode generation and rendering in a Blazor application. The concepts and techniques described here provide a solid foundation for integrating barcode functionality directly into your applications.
Our example project, including the Blazor app demonstrated in this article, is available here on GitHub 💻. Feel free to explore it, test the app, and propose improvements or alternate solutions. You can also try the live application here.
If you’d like to connect, feel free to reach out to me on LinkedIn 🔗. I’m always excited to discuss Blazor, hybrid apps, and other development topics. Questions, feedback, or networking opportunities are all welcome!
Thank you for reading, and happy coding! 🚀

You may also read

Native MapLibre on .NET MAUI Hybrid (iOS): The Missing Piece We Had to Build Ourselves
Some time ago, I published an article about integrating native MapLibre maps into a .NET MAUI Hybrid application on Android using a custom binding approach.
Ruslan Dudchenko
Ruslan Dudchenko
10 Dec 2025
Building and Releasing a .NET MAUI App to Google Play Using Azure DevOps YAML Pipelines
Publishing a mobile app to the Google Play for the first time can be difficult. Developers often face questions about certificates, signing, store rules, and how everything works together in a CI/CD pipeline. When you add .NET MAUI and cloud builds to this process, it can become confusing, especially without clear documentation.
Ruslan Dudchenko
Ruslan Dudchenko
18 Jan 2026
Streaming Log Data Across Networks: Building a Real-Time Log Pipeline in .NET and Blazor
A deep dive into how we built a chunked NDJSON streaming pipeline that moves API logs from a remote client application, through a relay API, to a Blazor viewer — with two modes of consumption, a Command Pattern foundation, and zero buffering on the server.
Andrii Kozmenchuk
Andrii Kozmenchuk
28 May 2026

What our clients say

Senior Angular Developer

Aug 11, 2025

Need help fixing an Azure Key Vault issue in Blazor Server

Apr 3, 2025

Need help fixing Graph connection issue in Blazor Server (prod env)

Mar 11, 2025

C# Blazor + EF Core Tutor — 1:1 mentoring / pair debugging

Feb 13, 2026

Azure Pipeline for .Net Maui

Jan 4, 2025

Epic Solutions Grocery project

Dec 9, 2024

.NET C# Blazor Developer for CRM Rewrite

Oct 6, 2022

Excellent work from start to finish. The developer resolved all problems in our Angular app and delivered new features without any fuss. Professional, reliable, and highly skilled.

FAQ

Do you provide support after launch?

Yes, we provide post-launch support, including maintenance, updates, bug fixes, and product improvements as needed.

How long does it take to develop a website or an app?

The timeline depends on the project complexity. On average: a website takes 2–6 weeks, and an app takes 2–4 months.

Can you help if I don’t have a clear idea yet?

Yes, we help shape your idea, define features, and create a product concept.

How much does project development cost?

The cost depends on the scope and complexity. We provide a custom estimate after discussing your requirements.

Can I order a redesign of an existing website or app?

Yes, we offer redesign services, improve UX/UI, and update the functionality of existing products. We also have strong experience working with legacy systems and complex codebases.

Is it possible to order only design or development?

Yes, you can order design or development separately based on your needs.

Which countries do you work with?

We work with clients worldwide and have experience with international projects.

Let’s team up!

Fill out the form to get in touch

By clicking this button I accept Privacy Policy of this site.

Got an idea?

We're all ears 😊

Drop us a line

admin@vertexcode.dev