Native MapLibre on .NET MAUI Hybrid (iOS): The Missing Piece We Had to Build Ourselves


Introduction — Why This Article Exists
Some time ago, I published an article about integrating native MapLibre maps into a .NET MAUI Hybrid application on Android using a custom binding approach.
👉 If you haven’t read that one yet, start here: Native MapLibre (Mapbox) Maps in MAUI Hybrid App (Android)
That article focused entirely on Android. The base architecture, the idea of hosting a native map under a BlazorWebView, and manually routing input between them — all of that was covered there.
But there was a big missing part: iOS
At the time of writing this follow-up, there was no ready-to-use MapLibre iOS binding for .NET MAUI. There is a native iOS SDK. There is a native Android SDK. But no maintained .NET binding for iOS that could be directly plugged into a MAUI Hybrid app.
So in our team, we made a decision to build the binding ourselves.
And since we don’t build iOS bindings every week, a lot of things were unclear:
- What exactly should be downloaded to build binding from?
- How to correctly generate bindings with Sharpie?
- Why the generated C# code does not compile?
- Where to place .cs, .a, .framework, .xcframework files?
- Why Blazor steals all touches from the map?
- And how to expose all of this nicely through services?
Most of the answers were found by trial, pain, logs, and a lot of questions to AI.
This article is the clean result of that journey. The result project with bindings connected can be found here on GitHub. All of the code samples below can be found in the repo.
Where to Get MapLibre for iOS
For the iOS part of the project, we relied exclusively on the official MapLibre native distribution, which is published as part of the MapLibre Native repository on GitHub. All official builds are available on the releases page:
Releases · maplibre/maplibre-nativeMapLibre Native - Interactive vector tile maps for iOS, Android and other platforms. - Releases ·…MapLibre Native - Interactive vector tile maps for iOS, Android and other platforms. - Releases ·…github.comOn the page, you can see something like on the screenshot below
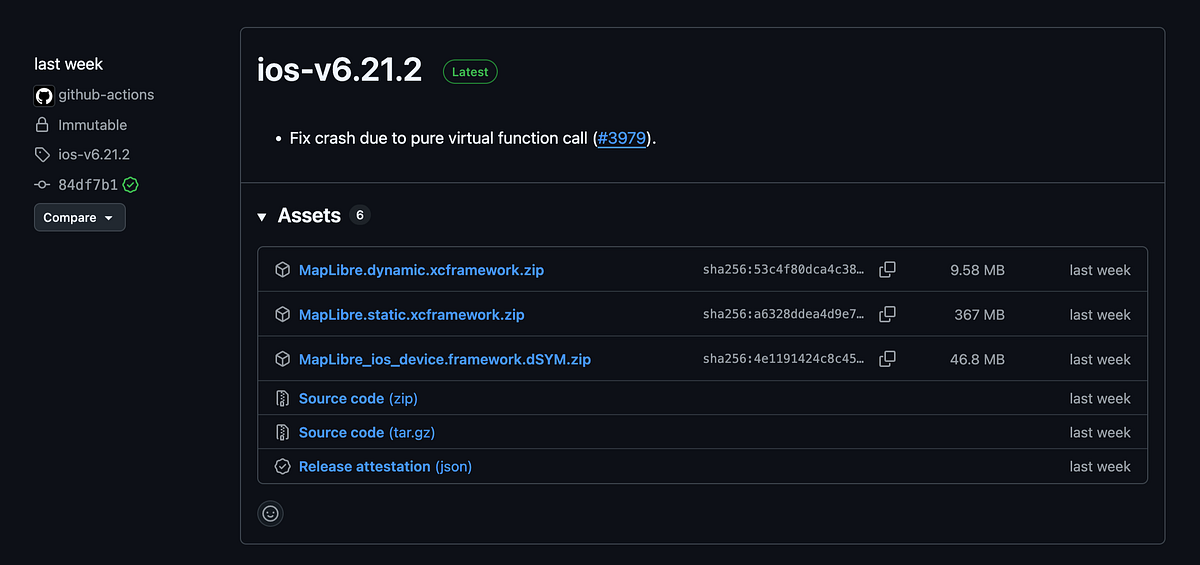
We use the dynamic build of the MapLibre iOS framework because it integrates more naturally with a MAUI Hybrid application. A static library must be fully linked into the app binary together with all of its native dependencies, which increases build complexity in hybrid setups. With a dynamic framework, the library is loaded at runtime as a separate component, which avoids heavy static linking and fits much better into MAUI’s existing native toolchain. For this reason, the dynamic .xcframework turned out to be the simpler and more reliable choice.
Where to Place the Native Library in Your Solution
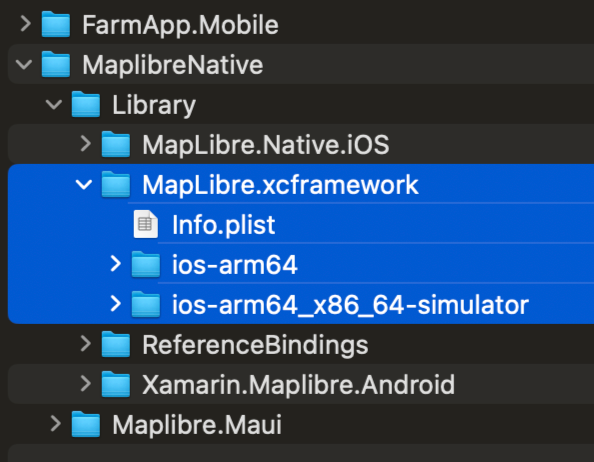
Once the dynamic iOS framework is downloaded, the next step is integrating it cleanly into the solution structure. Instead of placing the native files directly into the MAUI project, the framework is kept inside a dedicated Library folder that holds all platform-specific native components. This keeps the solution organized and avoids mixing managed application code with low-level native artifacts.
After downloading the release from GitHub, the extracted MapLibre.xcframework is copied into a directory in the solution, similar to demonstrated in the next screenshot
This is done using conditional native references directly inside the .csproj of the iOS binding project:
What happens here is very straightforward. When the project is built in Debug mode, the simulator version of the framework is used — the one that contains both arm64 and x86_64 architectures. This allows the app to run on both Apple Silicon simulators and older Intel-based ones. When the project is built in Release mode, the device-only arm64 framework is selected instead, which is exactly what is needed for real iPhone and iPad hardware.
This small configuration detail is crucial. Without it, the project would either fail to run on the simulator or fail to build for real devices. By explicitly wiring the correct framework variant to each build configuration, the native MapLibre library becomes a seamless part of the iOS build pipeline.
Generating the Binding with Sharpie
Once the native framework was wired into the project, the next step was to make it usable from .NET. For that I used Objective Sharpie, the usual tool for generating C# bindings from Objective-C headers. The idea is simple: you point Sharpie at the MapLibre headers from the .xcframework, and it produces ApiDefinitions.cs and StructsAndEnums.cs that describe the native API in C# terms.
In practice it wasn’t quite that smooth, mostly because of the toolchain combination: recent Xcode, iOS 17.5 simulator, and the current .NET iOS SDK. When I first ran Sharpie against the framework, everything appeared to work, but trying to use the result quickly led to issues related to the iPhoneSimulator 17.5 slice inside the framework. The simulator binary and the device binary both needed a small “surgery” so that the rest of the toolchain would treat them nicely.
To fix that, I ended up patching both slices of the framework directly in the .xcframework — one for the simulator (ios-arm64_x86_64-simulator) and one for devices (ios-arm64). The idea of the patch is straightforward: adjust the metadata in each binary so that it matches what the current SDK and simulator expect. In the setup that boiled down to running two almost identical commands, one per slice:
After that patch, the framework stopped triggering simulator-specific failures and could finally be processed correctly on both simulator and real hardware.
With the binaries fixed in place, the next step was to actually run Sharpie against the headers contained in the framework. This is the command I used to generate the initial binding files:
This command tells Sharpie exactly which SDK to use, limits the scan scope to the MapLibre headers inside the framework, and explicitly passes all header files for processing. The result is a new output folder containing the generated ApiDefinitions.cs and StructsAndEnums.cs files, which then get added to the iOS binding project.
That still wasn’t the end of the story. The C# code generated by Sharpie also needed some manual clean-up before it would compile cleanly and play nicely with the rest of the app. Some of the attributes that Sharpie added by default turned out to be problematic for this particular framework and toolchain combination. For example, a few classes came out decorated with the [Static] attribute in places where it simply didn’t make sense and confused the build, so those attributes had to be removed.
Another category of issues came from duplicate signatures: different Objective-C methods that Sharpie mapped to the same C# signature, or overloads that looked identical from the C# compiler’s point of view. These caused build errors about duplicate definitions, so they had to be either removed or slightly renamed on the managed side. There were also a couple of minor type tweaks (for instance, adjusting some handle types) that I fixed directly in the generated files.
After that round of patching and cleanup, the binding finally reached the point where it could be referenced from the MAUI project, built consistently for both simulator and device, and actually used to create a MapLibre map view from C#. From the outside this whole process now looks like “just run Sharpie and add the project reference”, but under the hood it involved a fair amount of negotiation between the native binary, the simulator version, and what .NET was willing to accept as a valid binding.
Conditional Event Routing Between Blazor and the Native Map on iOS
A key requirement in our application is the ability to route user input selectively between the Blazor WebView and the underlying native MapLibre view. The UI is composed of a native map serving as the background layer, with interactive Blazor controls rendered on top. Depending on where the user taps, input needs to go to one layer or the other.
The logic behind this is straightforward: if the touch lands on one of the floating Blazor controls, the event should be handled by the Blazor WebView. If it lands outside those controls — directly on the visible map — the event should be passed to the native MapLibre view. When the user is on a different page, or when modal dialogs or overlays are active, all input is routed to Blazor by default.
On Android, this is relatively simple to implement. The platform allows interception of input at the Activity level, where events can be inspected and forwarded either to the WebView or the native map based on the current conditions. This provides full control over dispatching.
On iOS, the situation is different. The system does not provide a supported mechanism to manually re-dispatch a UIEvent to a different view after it has already been assigned. The correct decision must be made earlier—during the hit-testing phase, before the system finalizes which view will own the touch.
To accommodate this, we introduced a custom wrapper component derived from AbsoluteLayout. This component contains both the Blazor WebView and the MapLibre view, and it overrides hit-testing to determine which child should receive the touch based on the current UI state.
Below is the xaml page where HitRoutingAbsoluteLayoutis used:
Within the overridden hit-test method, we evaluate the touch coordinates relative to the layout of the floating Blazor controls, check the active page, and account for modal overlays. This allows the system to deliver the event directly to the appropriate view from the outset, which is the recommended approach for iOS. The code of the HitRoutingAbsoluteLayoutis presented below:
Enabling Actual Transparency for BlazorWebView on iOS
Another detail that required platform-specific handling was transparency. Setting BackgroundColor="Transparent" on a BlazorWebView is sufficient on Android but not on iOS. Even with a transparent background defined in XAML, the underlying native WebView does not become visually transparent.
To resolve this, we extended the BlazorWebView and used the BlazorWebViewInitialized event to configure transparency at the native WebView level. After applying this adjustment, the MapLibre view became visible beneath the Blazor UI while still allowing Blazor to render interactive elements on top. The code of theCustomBlazorWebViewis presented below:
Complete Solution, Demo, and Next Steps
At this point, all the main pieces of the integration are in place: the native MapLibre framework is connected on iOS, the binding is generated and adjusted, the MAUI project selects the correct platform implementation automatically, and conditional event routing between Blazor and the native map works as intended. The transparency layer is also configured so that Blazor UI elements can be rendered cleanly on top of the native map.
The complete working solution, including the iOS binding setup and all related infrastructure, is available in the GitHub repository. A live demo of the final result is shown below, demonstrating how the native map and Blazor UI operate together inside a single MAUI Hybrid application.
This architecture opens the door to a wide range of scenarios where high-performance native rendering and flexible web-based UI can coexist within one application: map-based dashboards, tracking systems, interactive overlays, and data-driven visualizations.
If you have questions about any part of this integration, want to discuss the approach in more detail, or are working on something similar, feel free to reach out. You can contact me directly or connect with me on LinkedIn — I’m always open to technical discussions and feedback.
Thank you for reading, and happy coding!