Implementing Google OAuth in a .NET MAUI App Using an ASP.NET Backend


Menu
- Introduction
- Why Google OAuth in .NET MAUI Is Harder Than Expected
- Architecture of the Solution
- Creating a Project in Google Cloud Console
- Configuring OAuth Credentials
- Why We Use ngrok for Local Development
- Backend Implementation with ASP.NET API
- Integrating Google Authentication in the MAUI Application
- Handling OAuth Redirects in Mobile Apps
- Deep Linking and Custom URI Schemes
- Common Problems and How to Solve Them
- Final Result
- Conclusion
- Useful resources
1. Introduction
Adding Google authentication to an application often looks simple at first glance. The idea is straightforward: the user clicks a login button, signs in with Google, and returns to the application already authenticated. Many tutorials make it appear as if the process requires only a few configuration steps and a small amount of code.
However, the situation becomes significantly more complicated when working with a mobile application built with .NET MAUI. Unlike traditional web applications, mobile apps must interact with the system browser, handle redirects across different platforms, and safely return control back to the application after the authentication process is completed.
In addition to that, Google OAuth introduces several strict requirements regarding redirect URI configuration, application verification, and token exchange. When these rules are combined with the specifics of mobile platforms such as Android and iOS, developers often encounter errors like redirect_uri_mismatch, problems with local development environments, issues returning from the browser back into the application, and difficulties handling OAuth callbacks.
In this article, I will walk through a practical solution for integrating Google authentication into a .NET MAUI application using an ASP.NET API backend. Instead of focusing only on configuration steps, the goal is to explain how the entire system works together: how the mobile client initiates authentication, how the backend communicates with Google, and how the application safely receives the final authentication token.
This approach creates a clean separation of responsibilities where the mobile application remains lightweight, while the backend handles the sensitive operations such as exchanging authorization codes and generating authentication tokens.
2. Why Google OAuth in .NET MAUI Is Harder Than Expected
When developers first approach Google authentication, it is easy to assume that the application simply needs to open a login page and receive a token in response. In reality, OAuth is not a simple request-response interaction. Instead, it is a redirect-based protocol where the user is temporarily moved between multiple systems.
OAuth stands for Open Authorization, which is a widely used standard that allows users to authenticate through third-party providers such as Google, Microsoft, or GitHub without sharing their passwords directly with the application.
In a typical OAuth flow, the application sends the user to a provider’s authorization page. After successful authentication, the provider redirects the user back to the application through a specific URL known as a redirect URI.
This mechanism works naturally in web applications where the redirect simply loads another page in the same browser. However, in mobile applications things become more complicated because the browser is external to the app itself.
When a mobile application opens the Google login page, it usually does so through the system browser. After authentication is complete, the system must somehow return control to the mobile application. This requires special mechanisms such as deep links or custom URI schemes.
Another challenge is related to Google’s strict validation rules for redirect addresses. If the redirect URL used during authentication does not exactly match the one configured in Google Cloud Console, the authentication request fails with an error such as redirect_uri_mismatch.
Local development introduces additional difficulties. A backend server running on localhost is not accessible from the public internet, but Google must be able to call the redirect endpoint. This means developers often need a tunneling tool such as ngrok to temporarily expose a local server to the internet.
Because of these combined factors, implementing Google OAuth in a mobile environment often requires careful architectural planning rather than simply copying configuration settings.
3. Architecture of the Solution
To simplify the mobile application and improve security, the authentication process in this solution is handled by a backend service instead of the mobile client directly communicating with Google.
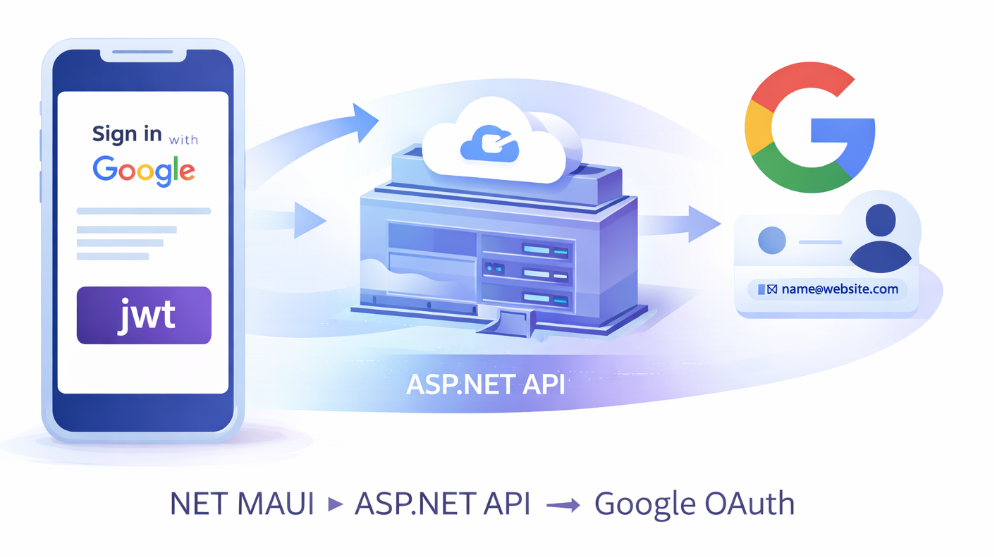
In this architecture, the .NET MAUI application acts only as the user interface layer responsible for initiating the authentication flow and receiving the final authentication result. All communication with Google OAuth endpoints is handled by an ASP.NET API.
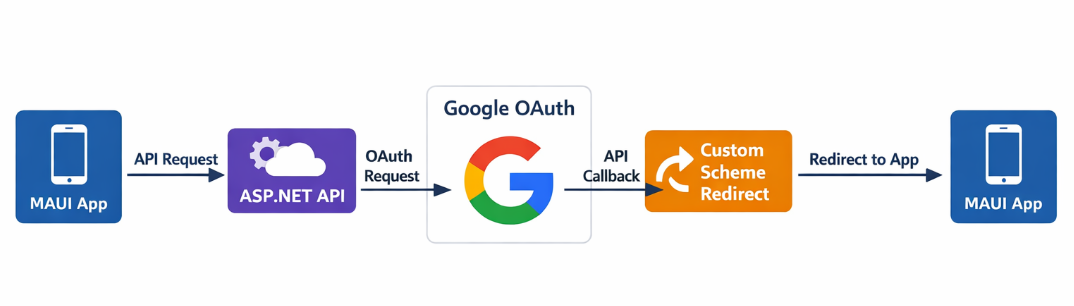
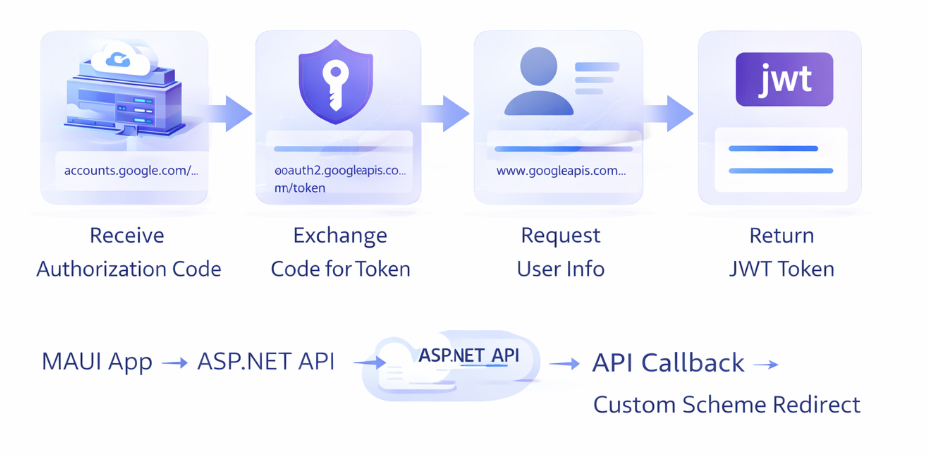
The flow works as follows.
The mobile application calls an API endpoint named api/identity/google-oauth/initiate. This endpoint generates the correct Google authorization URL and returns it to the client.
The mobile application then opens this URL in the system browser. The user signs in with Google and grants the requested permissions.
After authentication is completed, Google redirects the user to the backend callback endpoint, which is implemented in the API as api/identity/google-oauth/callback.
At this stage the backend receives an authorization code. This code is not the final authentication token. Instead, it is a temporary value that must be exchanged for an access token by sending a request to Google’s OAuth token endpoint.
Once the backend receives the access token, it uses it to request basic information about the authenticated user, such as their email address and name.
After identifying the user, the backend generates its own authentication token using JWT (JSON Web Token). This token represents the authenticated session inside the application’s own system.
Finally, the backend redirects the user back to the mobile application using a custom URI scheme such as:
com.googleauth.maui://oauth2redirect?token=...
This special link is recognized by the operating system and automatically opens the mobile application.
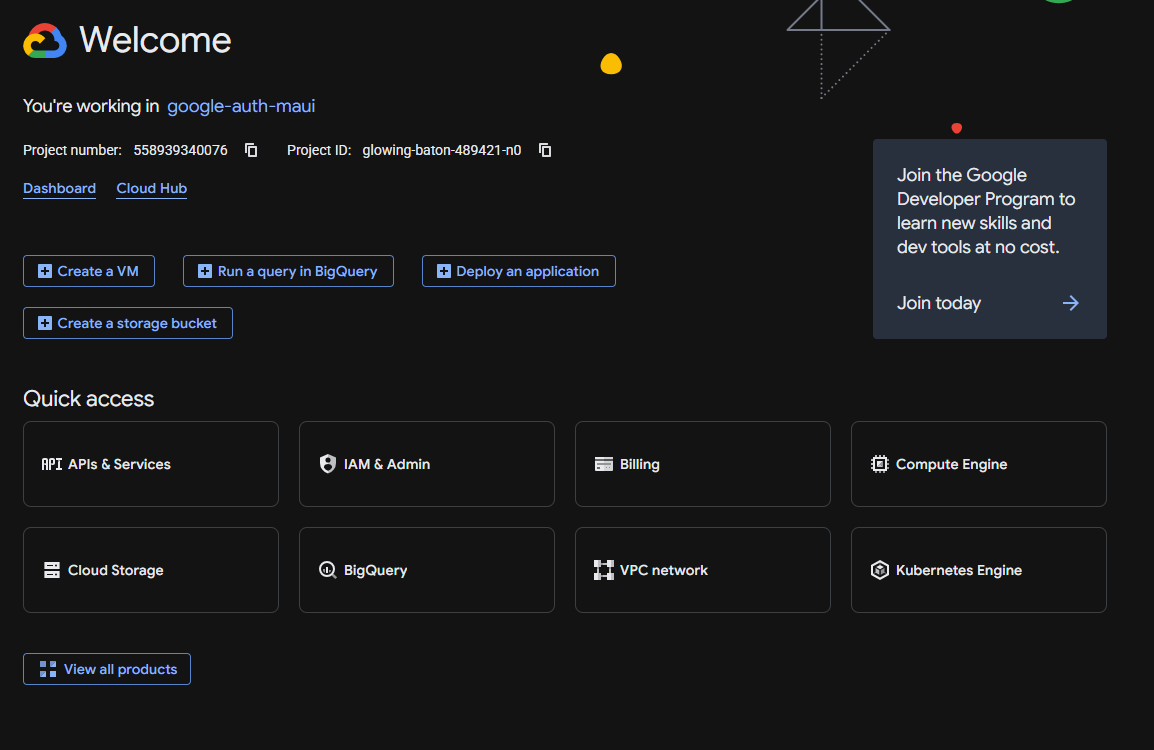
4. Creating a Project in Google Cloud Console
Before implementing the authentication logic, it is necessary to create a project in Google Cloud Console. This platform provides the infrastructure required to register an application and enable OAuth authentication.
To begin, open the website:
At the top of the interface you will see a project selector labeled Select a project. If you already have an existing project you may choose it here. Otherwise you can create a new project by clicking New project.
During project creation Google requires a Project Name. This name identifies the project in your cloud environment but is not necessarily visible to end users.
After creating the project, open the navigation menu on the left side of the interface and locate the section named APIs & Services. Within this section you will find the Credentials page, which is used to create authentication credentials for your application.
When attempting to create OAuth credentials for the first time, Google usually requires configuration of an OAuth consent screen.
The consent screen is the page shown to users when they are asked to grant your application permission to access their Google account information.
5. Configuring OAuth Credentials
Once the consent screen is configured, the next step is creating the OAuth client itself.
Inside the Credentials page, select Create Credentials and then choose OAuth client ID.
Google will ask you to select an Application type. Even though the final client is a mobile application, the correct choice in this architecture is Web application.
This is because the OAuth callback is handled by the backend server rather than by the mobile application directly.
The form also contains a field called Authorized JavaScript origins. This setting is primarily used for browser-based applications where JavaScript code communicates directly with Google APIs. Since our implementation uses a backend server, this field is not essential.
The most important configuration is Authorized redirect URIs. This field defines which URLs Google is allowed to redirect users to after authentication.
For example:
If the application is still in development, the backend may be running locally. In this case a tool such as ngrok can be used to create a temporary public URL that forwards traffic to the local server.
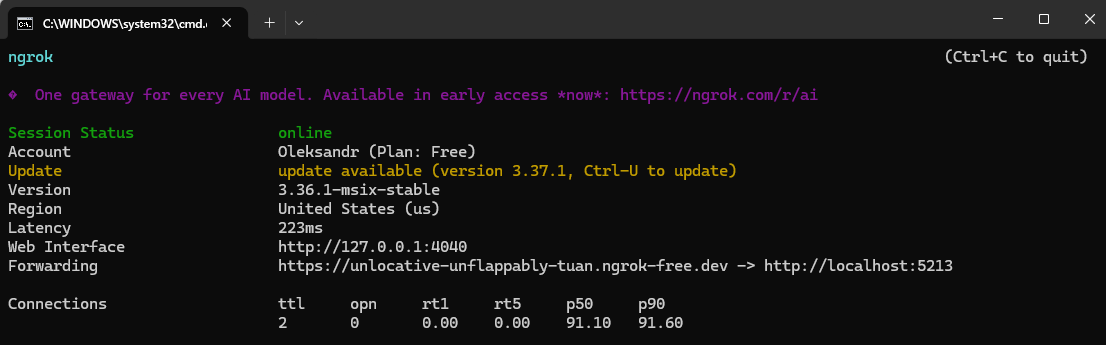
6. Why We Use ngrok for Local Development
During development the backend API often runs on a local address such as:
However, Google OAuth requires the redirect endpoint to be accessible from the internet. Since localhost only exists on the developer’s machine, Google cannot call this address directly.
ngrok solves this problem by creating a secure tunnel between the internet and the local development server.
Running the command
ngrok http http://localhost:5213
creates a public HTTPS URL such as
All traffic sent to this address is forwarded to the local server.
This allows the OAuth callback to work even while the backend is running locally.
7. Backend Implementation with ASP.NET API
While the mobile application initiates the authentication process, the most important part of the OAuth flow happens on the backend. The backend is responsible for communicating with Google, validating the authentication response, retrieving user information, and generating an authentication token that the mobile application can use for further requests.
In this project the backend is implemented using an ASP.NET Web API. The main entry point for authentication is the controller IdentityController. This controller acts as the bridge between the mobile application and Google's OAuth servers.
The controller exposes three main endpoints:
api/identity/google-oauth/initiate
api/identity/google-oauth/callback
api/identity/me
Each of these endpoints has a specific role in the authentication process.
The endpoint api/identity/google-oauth/initiate is responsible for starting the OAuth flow. When the MAUI application wants to authenticate a user, it calls this endpoint. The backend then constructs a Google authorization URL using the service GoogleOAuthService.
This service builds a properly formatted OAuth request that contains several parameters required by Google. These parameters include the client_id, which identifies the application in Google Cloud, the redirect_uri, which tells Google where to send the user after authentication, the response_type, which indicates that the application expects an authorization code, and the list of requested scopes such as openid, profile, and email. Scopes define which pieces of user information the application is allowed to access.
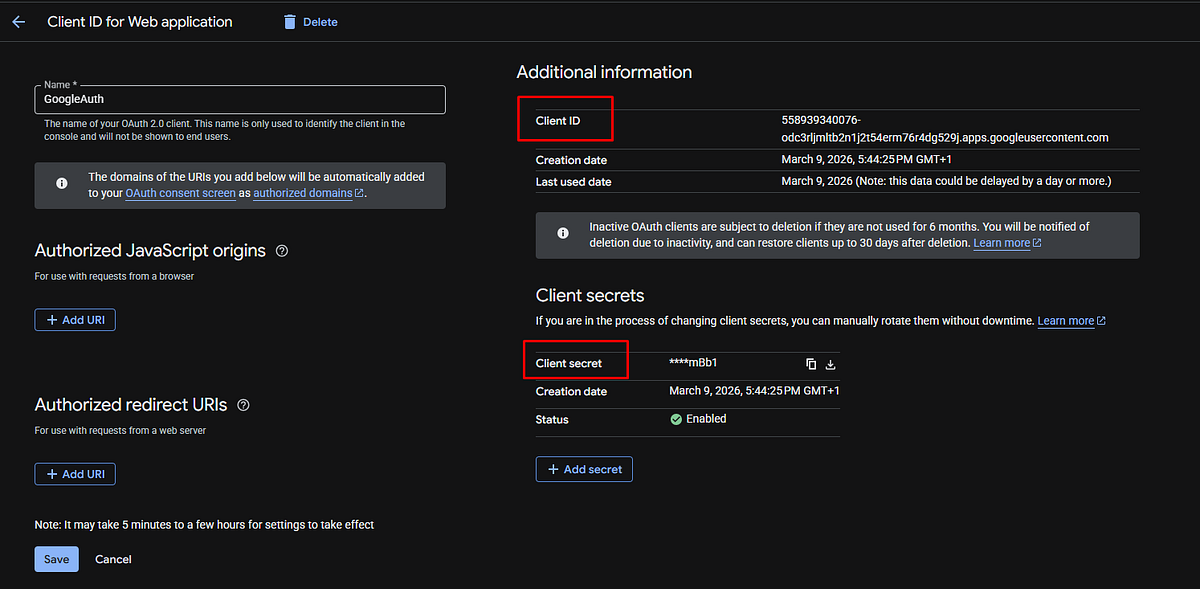
The values required for the OAuth configuration can be obtained from the Google Cloud Console. After creating an OAuth client, navigate to the Credentials section, open the created client, and copy the values labeled Client ID and Client secret.
These values must then be added to the backend configuration file appsettings.Development.json inside the GoogleOAuth section.
Example configuration:
The value of ClientId corresponds to the identifier assigned to the OAuth client in Google Cloud. The ClientSecret acts as a private key used by the backend when exchanging the authorization code for an access token.
The field PublicRedirectUri must match the redirect address configured in Google Cloud. During local development this usually points to a public ngrok tunnel that forwards requests to the local API server.
For example:
This endpoint corresponds to the callback handler implemented in the backend controller.
These values must then be added to the backend configuration file appsettings.Development.json inside the GoogleOAuth section.
Example configuration:
Once the URL is generated, the backend returns it to the MAUI application. The mobile app then opens this URL in the device browser, allowing the user to authenticate with their Google account.
After the user successfully signs in and grants permission, Google redirects the browser back to the backend endpoint:
api/identity/google-oauth/callback
This endpoint receives an authorization code from Google. An authorization code is a temporary value that proves the user has successfully authenticated. However, this code cannot be used directly to access user data. It must first be exchanged for an access token.
To perform this exchange, the backend sends a secure request to Google’s token endpoint:
The request includes the authorization code, the client ID, the client secret, and the redirect URI that was originally used during the authorization request. If everything is valid, Google responds with an access token.
An access token is a temporary credential that allows the backend to access Google APIs on behalf of the authenticated user.
Once the access token is obtained, the backend uses it to request user information from Google’s user profile endpoint:
The response contains basic identity information such as the user’s email address and display name.
At this stage the system needs to determine whether the authenticated user already exists in the application database. This logic is implemented through the interface IUserStore. Interfaces in .NET define a contract that specifies which operations must be implemented without enforcing a specific storage mechanism.
In the demonstration project the interface is implemented by the class InMemoryUserStore. This implementation stores user data temporarily in memory. While this approach is not suitable for production environments, it simplifies the example and keeps the focus on the OAuth integration itself. In a real application this component would typically be replaced with a database-backed implementation using technologies such as Entity Framework Core.
If the user does not already exist in the system, a new user record is created automatically.
After the user has been identified or created, the backend generates an authentication token. This is handled by the service JwtTokenService.
A JWT (JSON Web Token) is a compact and secure way to represent authenticated user sessions. Instead of storing session data on the server, the token itself contains encoded information about the user. This token is digitally signed so that it cannot be modified by the client.
The token generated by JwtTokenService typically contains several claims, such as the user identifier, email address, and expiration time. Once created, the token is returned to the mobile application.
However, instead of sending the token directly through the browser, the backend performs a final redirect. This redirect uses a custom URI scheme, which allows the mobile application to capture the authentication result.
The redirect looks similar to the following structure:
com.googleauth.maui://oauth2redirect?token=JWT_TOKEN
When the device receives a URL with this scheme, the operating system automatically forwards it to the MAUI application. The application then extracts the token and stores it securely using SecureStorage.
From that point forward, every API request made by the application includes this token in the Authorization header. The backend validates the token using ASP.NET authentication middleware, ensuring that only authenticated users can access protected endpoints such as:
api/identity/me
This endpoint simply returns information about the currently authenticated user.
To summarize the backend flow, the authentication process involves several sequential steps. The MAUI application requests an authorization URL, the backend generates the URL using Google OAuth parameters, the user authenticates with Google, the backend exchanges the authorization code for an access token, retrieves the user profile, creates or retrieves a local user record, generates a JWT token, and finally redirects the user back to the mobile application through a custom URI scheme.
Although the process may initially appear complex, each step has a clear responsibility. The mobile application handles user interaction, the backend communicates with Google and manages authentication logic, and the token provides a secure way to maintain the user session. Together these components create a reliable and scalable authentication architecture for cross-platform .NET MAUI applications.
8. Integrating Google Authentication in the MAUI Application
On the mobile side the authentication flow begins on a login page that calls the service GoogleAuthService.
This service sends a request to the backend endpoint google-oauth/initiate and receives the authorization URL.
The application then opens this URL using the system browser. This step is important because OAuth providers generally require authentication to occur in a trusted browser environment rather than inside an embedded web view.
When the user completes authentication, the backend redirects to the custom scheme URL. The operating system detects this scheme and launches the mobile application again.
The service GoogleAuthService uses a TaskCompletionSource to wait for the authentication result. This allows asynchronous code to pause execution until the callback event occurs.
After receiving the token, the application stores it using SecureStorage. This storage mechanism encrypts sensitive information such as authentication tokens.
Subsequent API requests are automatically authenticated using the AuthenticatedHttpClientHandler, which attaches the token to the Authorization header.
9. Handling OAuth Redirects in Mobile Apps
The most critical part of the mobile OAuth flow is returning from the browser to the application.
This is achieved using a mechanism called a deep link. A deep link is a special URL that is associated with a specific mobile application.
When the operating system detects a URL with a registered scheme, it opens the application instead of a web browser.
For example:
com.googleauth.maui://oauth2redirect
The Android platform handles this using an IntentFilter defined in MainActivity.
On iOS the same behavior is configured through the Info.plist file using the CFBundleURLSchemes configuration.
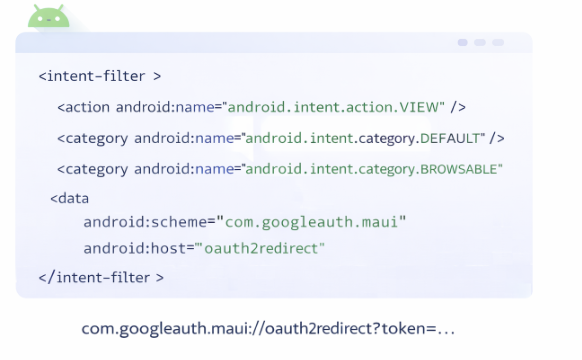
10. Deep Linking and Custom URI Schemes
A custom URI scheme is a URL format defined by an application rather than by the web.
Instead of using http or https, the application registers a unique identifier such as
com.googleauth.maui.
When the backend redirects the browser to this address, the mobile operating system launches the associated application.
This technique allows OAuth authentication to complete within the mobile app even though the authentication process itself occurs in the system browser.
11. Common Problems and How to Solve Them
One of the most frequent issues developers encounter is the error redirect_uri_mismatch. This happens when the redirect URI used in the authentication request does not exactly match the one configured in Google Cloud Console.
Another common problem occurs when the mobile application cannot access a backend running on localhost. Android emulators require a special address 10.0.2.2 to access services running on the host machine.
Deep linking issues are also common. If the custom scheme is not correctly registered in Android or iOS configuration files, the redirect from the browser will not reopen the application.
Finally, asynchronous flow handling can introduce complexity. Because the OAuth process occurs outside the application, special mechanisms such as TaskCompletionSource are required to wait for the authentication result.
12. Final Result
After integrating all components, the final authentication flow works smoothly.
The user opens the login page, clicks the Google sign-in button, authenticates through the browser, and is redirected back to the mobile application.
The application receives a JWT token, stores it securely, and uses it to authenticate all future API requests.
From the user’s perspective the process appears simple, but internally it relies on coordinated interaction between the mobile client, the backend API, and the Google OAuth service.
13. Conclusion
Implementing Google authentication in a .NET MAUI application requires a deeper understanding of OAuth mechanics, mobile platform behavior, and backend integration.
Although the initial setup can be frustrating due to configuration requirements and redirect handling, a well-designed architecture simplifies the long-term maintenance of the system.
By moving the sensitive OAuth logic to an ASP.NET API, using a custom URI scheme for mobile redirection, and storing authentication tokens securely on the device, it is possible to create a reliable and scalable authentication system.
Once properly configured, this approach provides a flexible foundation for adding additional identity providers, implementing role-based authorization, and extending the application’s authentication capabilities.
14. Useful resources
If you want to explore a working example of the Google authentication architecture described in this article, you can check the demo repository here:
The repository contains a complete implementation of the solution, including the .NET MAUI mobile application, the ASP.NET API backend responsible for handling the OAuth flow, and the integration logic that connects the mobile client with the Google authentication system.
Inside the project you will find the implementation of components such as GoogleAuthService, IdentityController, the GoogleOAuthService responsible for exchanging the authorization code for an access token, as well as the custom redirect handling through a mobile URI scheme.
If you plan to build your own authentication system using Google OAuth in a .NET MAUI application, the repository can serve as a practical reference implementation. You are welcome to explore the code, experiment with the architecture, and adapt the approach to your own projects.
Happy coding and smooth authentications 🚀