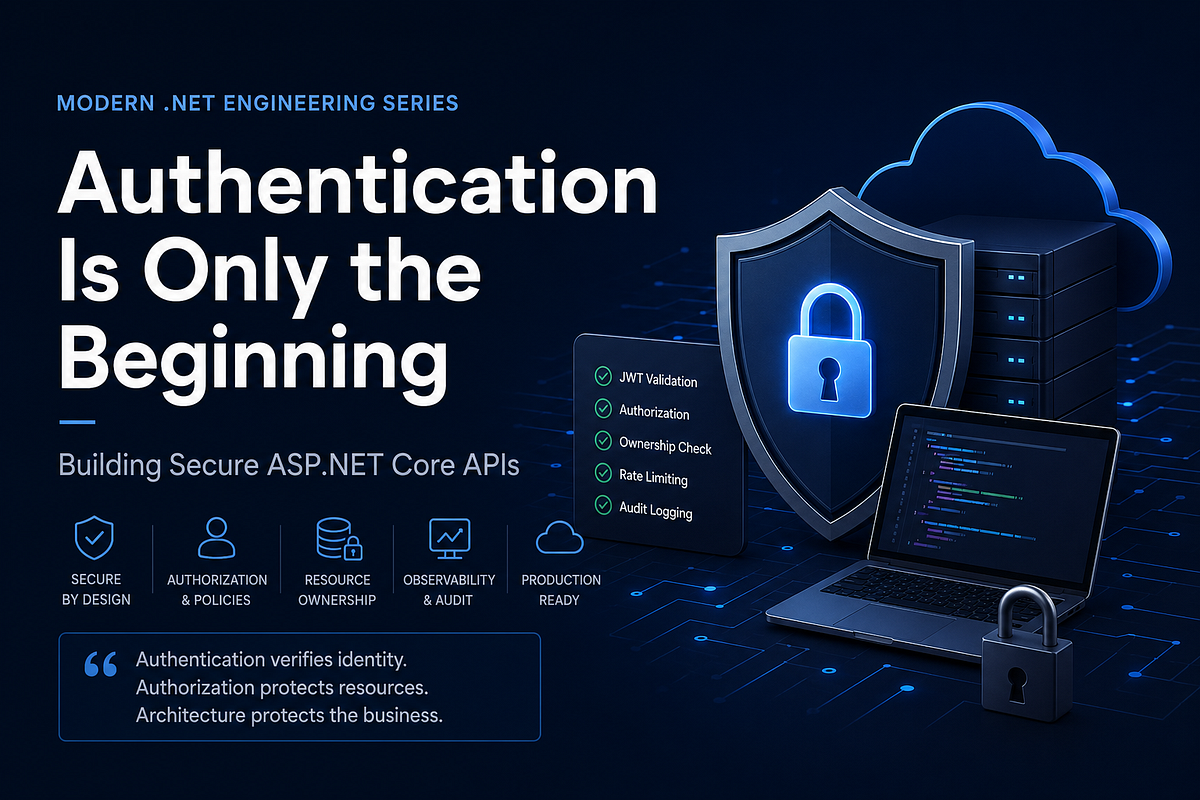
Building and Releasing a .NET MAUI App to App Store Using Azure DevOps YAML Pipelines


Introduction
Publishing a mobile app to the Apple App Store can be challenging, especially for developers doing it for the first time. Apple requires specific certificates, provisioning profiles, and strict signing rules, and all of them must be configured correctly to work in an automated CI/CD pipeline. Understanding how these pieces fit together in a cloud build environment is often difficult, as the required information is spread across multiple Apple and DevOps resources.
In a previous article, I explained how to build and release a .NET MAUI application to Google Play using Azure DevOps YAML pipelines. This article continues the same overall topic and focuses on iOS — building, signing, and preparing a .NET MAUI application for distribution through the Apple App Store using Azure DevOps.
This guide walks through the iOS release flow step by step. It explains Apple certificates, provisioning profiles, and code signing for iOS, and shows how to configure a macOS build agent and YAML pipelines that produce a signed iOS build ready for App Store submission.
Some general pipeline concepts, such as application versioning and working with Secure Files in Azure DevOps, are already covered in the previous article. For that reason, I recommend reading it first, as this article focuses mainly on the iOS-specific parts of the release process.
By the end of the article, you will have a clear understanding of how to build and prepare a .NET MAUI iOS application using Azure DevOps pipelines, with a working example you can adapt for your own projects.
iOS App Signing Basics
Before an iOS application can be distributed through the App Store, it must be properly signed using Apple’s code signing system. Code signing allows Apple to verify the app’s origin, ensure its integrity, and control which devices and distribution channels the app is allowed to use.
Unlike Android, iOS signing is based on a combination of certificates, App IDs, and provisioning profiles. All of these elements must be correctly configured and aligned with each other for a successful build and release.
Apple Certificates Explained
Apple provides several types of certificates, each used for a specific purpose in the iOS ecosystem. The most common ones are:
- Apple Development — used to sign apps for local development and testing on registered devices
- Apple Distribution — used to sign apps for TestFlight and App Store releases
- Push Notification certificates (development and production) — used to authenticate your app when sending push notifications
- Others
Each certificate type serves a different role, and using the wrong one will prevent the app from building or being accepted by Apple.
Since this article focuses on building and releasing a .NET MAUI app to TestFlight and later the App Store, we will work only with the Apple Distribution certificate.
Apple Distribution Certificate
The Apple Distribution certificate identifies you (or your organization) as the publisher of the application and is required to sign any build that will be uploaded to TestFlight or App Store Connect.
This certificate is created in Apple Developer / App Store Connect, where Apple manages:
- App IDs (Bundle Identifiers)
- Certificates
- Provisioning profiles
- App distribution settings
Once created, the distribution certificate is typically exported as a .p12 file.
This file contains:
- the public certificate issued by Apple
- the private key generated on your machine during certificate creation
The private key is critical — it is what actually allows the app to be signed. Without it, the certificate is useless for CI/CD or local builds. For this reason, .p12 files must be stored securely and never committed to source control.
Certificate and Provisioning Profile Lifetime
Apple signing assets are not permanent. Both certificates and provisioning profiles have expiration dates and must be renewed periodically.
An Apple Distribution certificate has a limited lifetime, typically one year, which is defined by Apple at the time the certificate is issued. When the certificate expires, it can no longer be used to sign new builds. Applications that are already published on the App Store are not affected, but releasing new versions becomes impossible until a new distribution certificate is created and configured.
Provisioning profiles also have an expiration date, usually one year. When a profile expires, it cannot be used to sign new builds, even if the distribution certificate itself is still valid. Unlike certificates, provisioning profiles do not always need to be recreated from scratch. In most cases, an existing profile can be edited and regenerated in the Apple Developer portal, for example to associate it with a renewed certificate or to extend its validity.
After renewing or regenerating a provisioning profile, the updated .mobileprovision file must be downloaded and used for signing. In CI/CD pipelines, this typically means replacing the old profile used by the build system.
To continue releasing new versions, you must ensure that:
- a valid Apple Distribution certificate is available
- the App Store provisioning profile is valid and up to date
- the CI/CD pipeline references the renewed signing files
Because of this, certificates and provisioning profiles should be treated as critical assets, monitored for expiration, and stored securely. In automated environments such as Azure DevOps, these files are commonly uploaded as Secure Files and installed during the signing step of the YAML pipeline.
Certificate Signing Request (CSR)
When creating an Apple certificate, Apple requires a Certificate Signing Request (CSR). A CSR is a small file that contains information about the developer or organization and, most importantly, a public key that will later be paired with a private key.
The CSR is generated locally, and at the same time a private key is created and stored on the machine where the CSR was generated. Apple never receives the private key — it remains on your system and is required later to sign applications.
After you upload the CSR to Apple Developer / App Store Connect, Apple uses it to generate a certificate that matches the private key created during the CSR generation. This is why certificates are always tied to the machine or environment where the CSR originated.
Where CSR Is Usually Created
In most cases, a CSR is generated using Keychain Access on macOS. This is the standard and recommended approach, even if the final build will run in a CI/CD pipeline.
The typical flow looks like this:
- Generate a CSR on a macOS machine (via Keychain Access)
- Upload the CSR to Apple Developer / App Store Connect
- Download the generated certificate
- Export the certificate together with its private key as a .p12 file
- Use the .p12 file in your build pipeline
Although it is technically possible to generate CSRs in other environments, macOS is almost always used because it integrates directly with Apple’s tooling and simplifies certificate management.
Why CSR Matters for CI/CD
The CSR defines the private key that will be used to sign the app. If the private key is lost, the certificate becomes unusable, even if it has not expired.
This is why, after downloading the certificate, it is common practice to export it immediately as a .p12 file and store it securely. In Azure DevOps pipelines, this .p12 file is typically uploaded as a Secure File and installed during the signing step.
Understanding the role of the CSR helps avoid common issues such as missing private keys, invalid certificates, or build failures in automated environments.
Preparing Apple Developer and App Store Connect
In the following sections, we will configure all required resources on the Apple side, including App IDs, certificates, provisioning profiles, and the application entry in App Store Connect. This walkthrough assumes a clean setup, where these components have not been created yet.
If you already have access to an existing Apple Developer account or an application where some of these elements are already configured, you may not need to repeat every step. In many real-world cases, an App ID or certificate already exists, but the setup is incomplete or was created for a different build process. In such situations, these sections can be used to finish the configuration and prepare everything for automated deployment.
This approach makes the setup clear both for developers working with Apple publishing for the first time and for those who need to complete or adapt an existing configuration to work with an Azure DevOps pipeline.
Setting Up App ID, Certificate, and Provisioning Profile
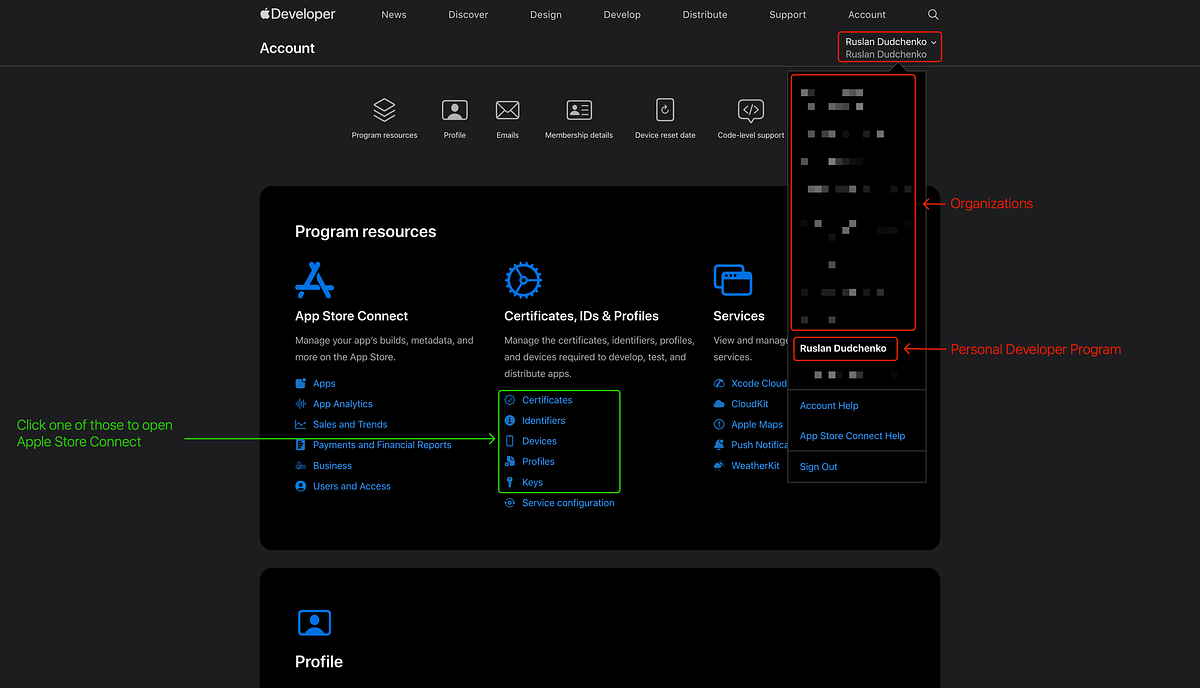
Now we can move on to creating the App ID, distribution certificate, and provisioning profile. To begin, open the Apple Developer Portal and sign in with your Apple Developer account. In the top-right corner of the page, you can select the team you want to work with — either an organization you are a member of or your personal Apple Developer Program account. If you are using a personal account, make sure it is fully set up, as enrollment in the Apple Developer Program is required and currently costs $99 per year. The selected team determines where the App ID, certificates, and provisioning profiles will be created (see image below).
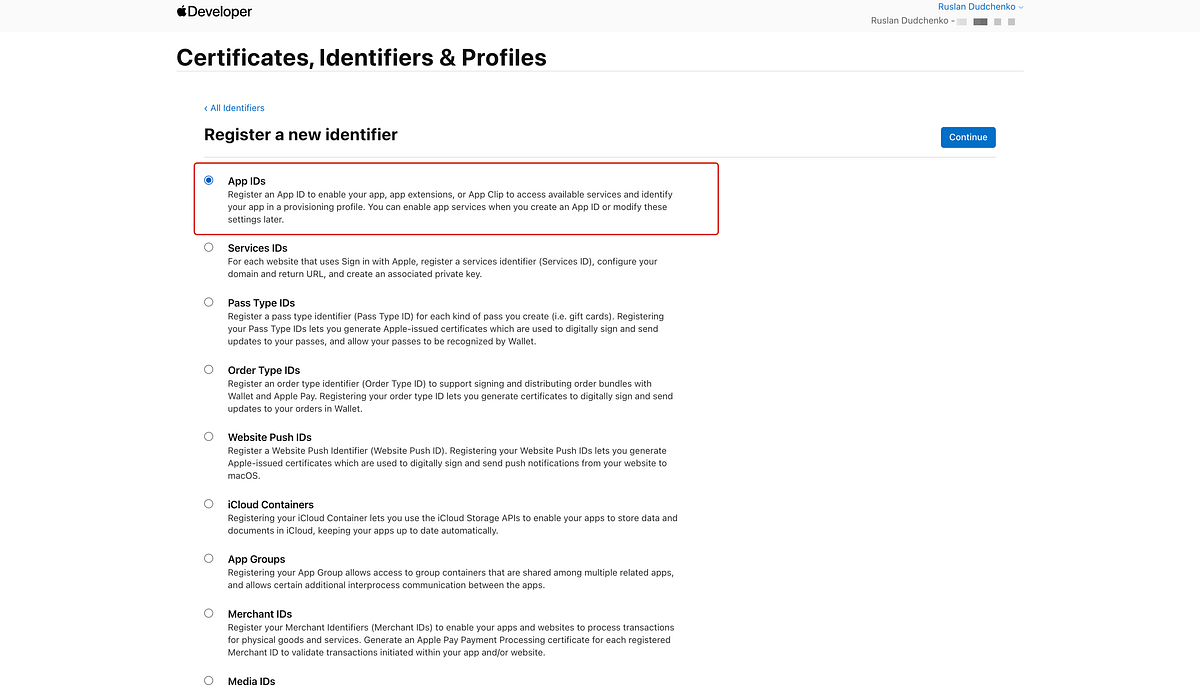
On this page, click the Identifiers link to open the section where App IDs are managed (see image below). We will start the setup process by registering the App ID, then creating the Apple Distribution certificate, and finally the provisioning profile. This order is important because a provisioning profile must be associated with both an existing App ID and a valid distribution certificate.

Click Register an App ID and select App IDs to begin the registration process (see image below).
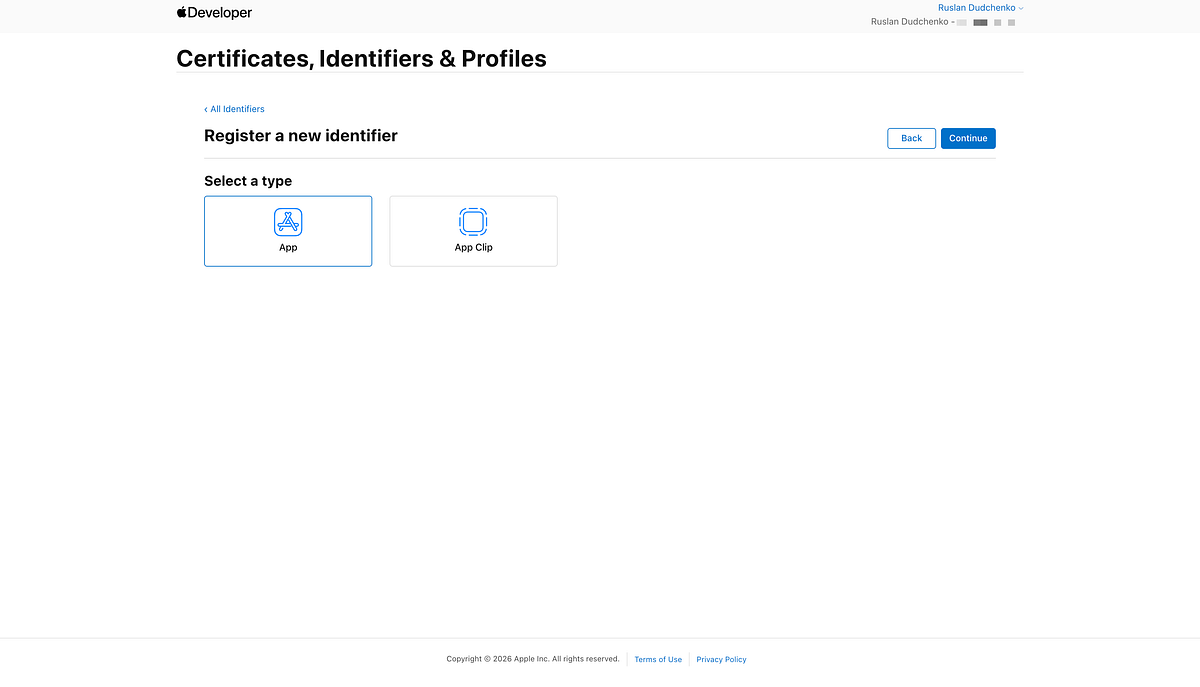
On the next step, select App as the identifier type and continue with the registration process (see image below).
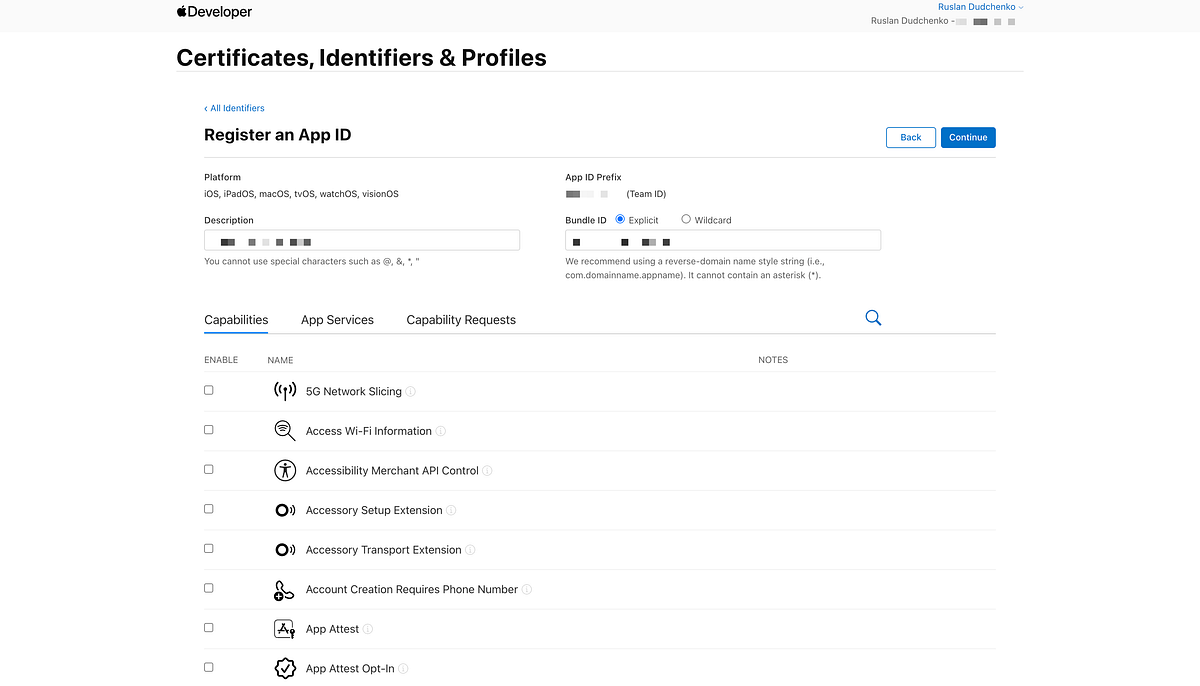
Enter your application Bundle Identifier (Package ID) and a description for the App ID, then click Register to create it (see image below). If your application requires specific capabilities, such as push notifications or associated domains, make sure to enable the corresponding options during this step.
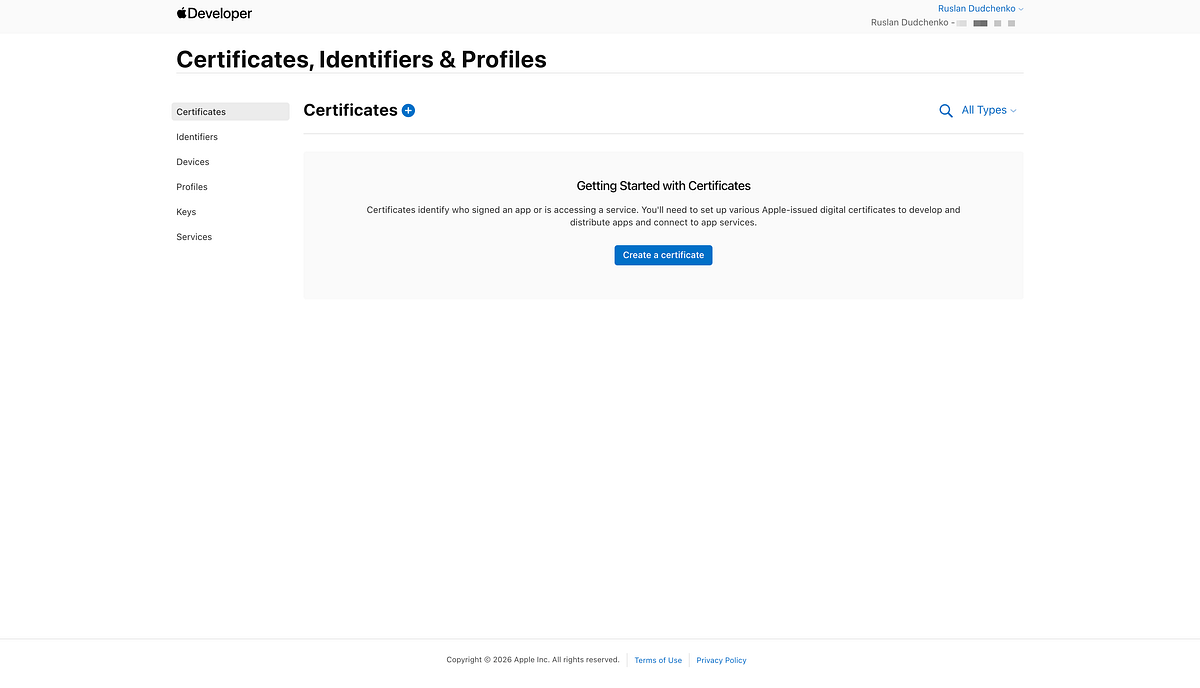
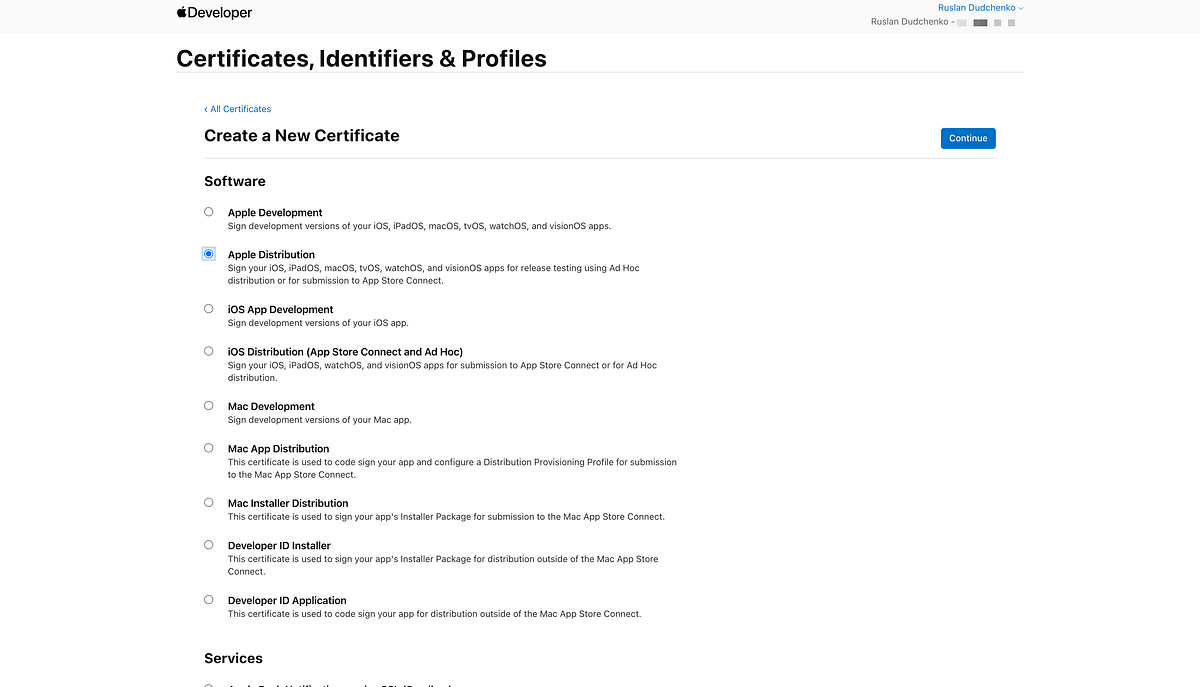
Now we can move on to creating the distribution certificate, which will be used to sign the application for TestFlight and App Store distribution (see image below).
Select Apple Distribution as the certificate type and click Continue to proceed with the certificate creation process (see image below).
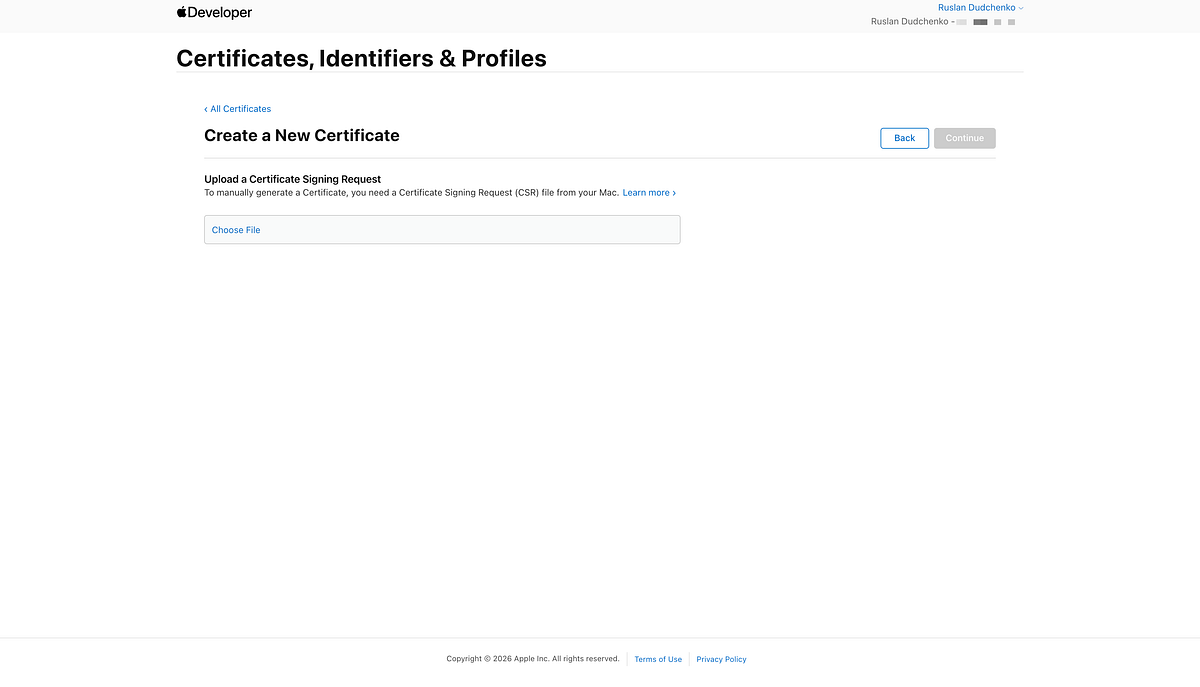
At this step, Apple will ask you to upload the Certificate Signing Request (CSR) (see image below).
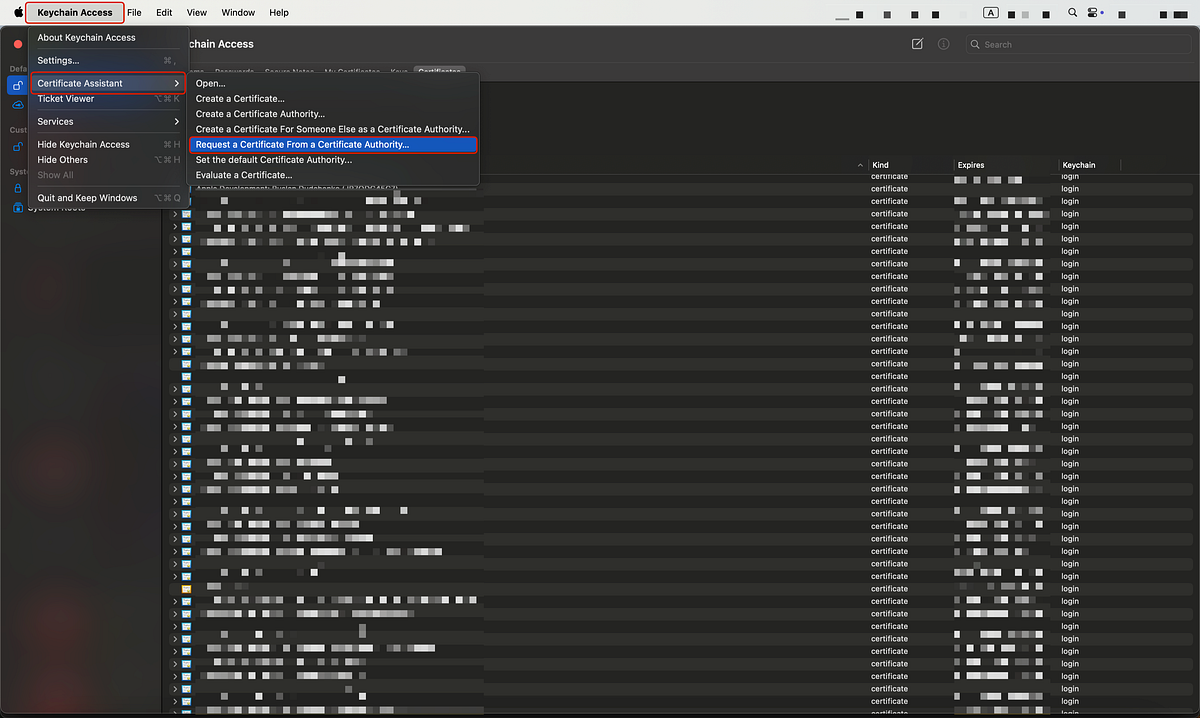
To generate the CSR, open the Keychain Access application on macOS. In the top menu, select Keychain Access, then Certificate Assistant, and choose Request a Certificate From a Certificate Authority (see image below).
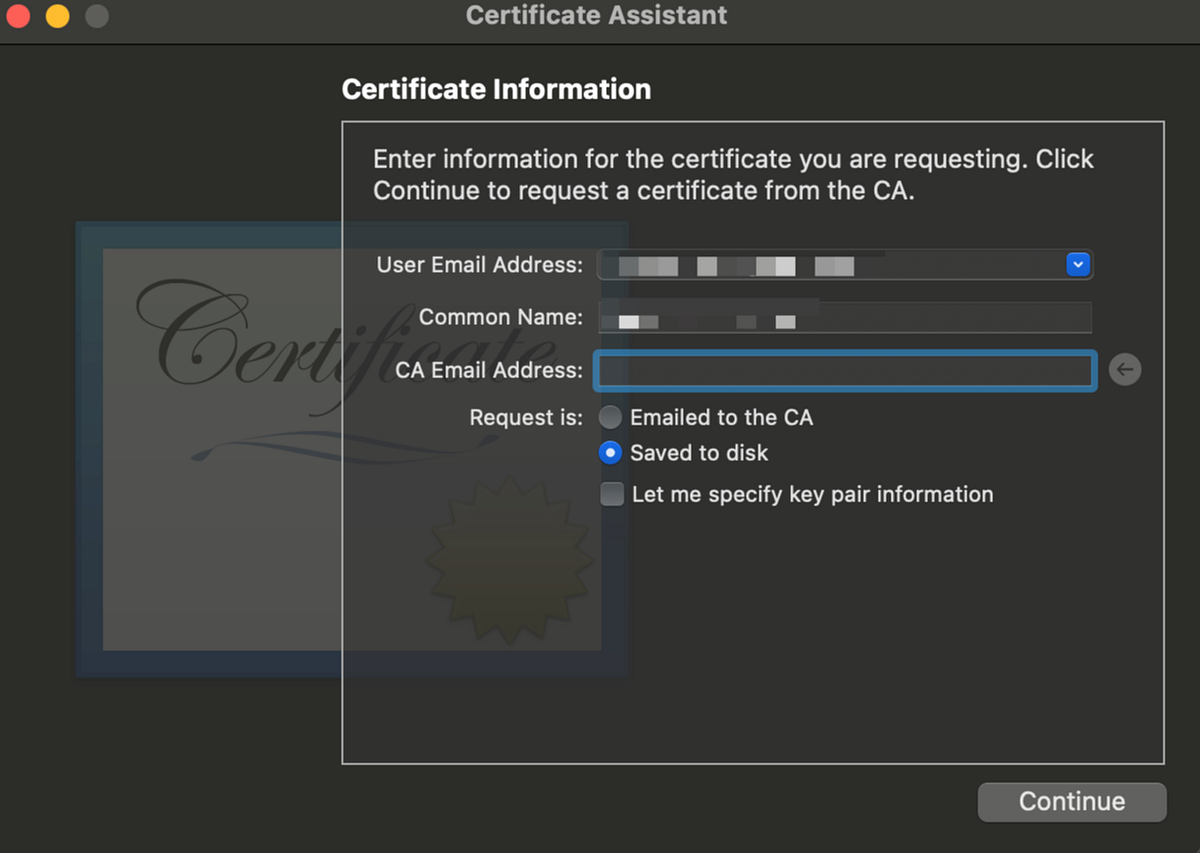
When generating a Certificate Signing Request in Keychain Access, the User Email Address should typically be the email associated with your Apple Developer account. This value is informational and does not affect the signing process itself, but using your Apple ID email makes it easier to identify the certificate later. The Common Name can be your personal name or your organization’s name and is used only as a human-readable label inside Keychain and App Store Connect. Apple does not strictly validate these fields — what actually matters is the private key generated together with the CSR and the Apple Developer account that submits the request. After typing values in, save the CSR to disk (see image below).
After generating the CSR, upload it in the certificate creation form in the Apple Developer portal. Once the certificate is issued, download it and save it to your local disk for later use in the build and signing process (see image below).

After the certificate is ready, it is time to create Provisioning Profile. For that, open the corresponding page in Apple Store Connect and click Generate Profile (see image below).
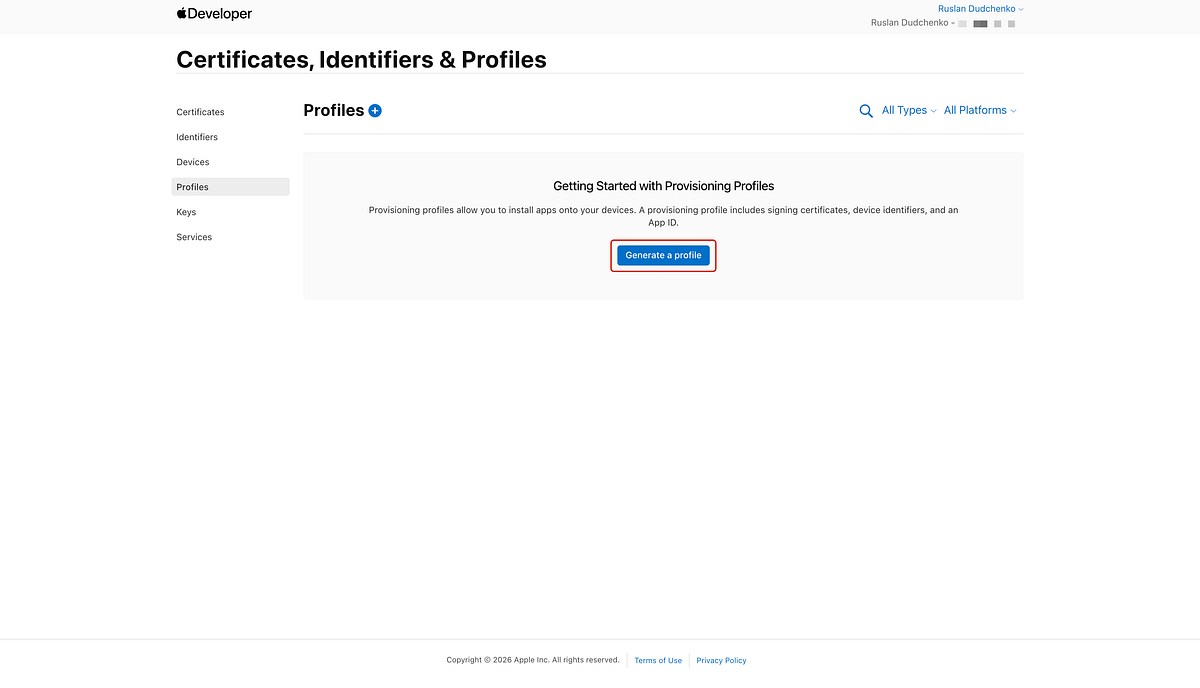
On this page, select the appropriate provisioning profile type for App Store distribution and proceed to the next step of the setup process (see image below).

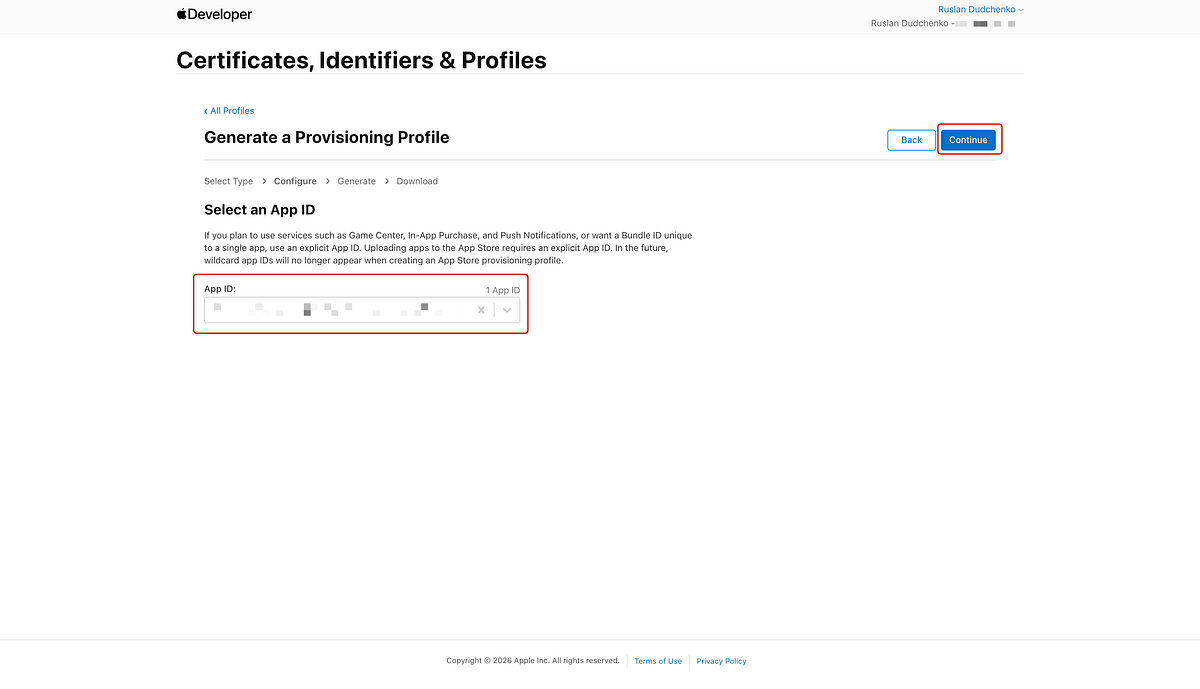
On this page, select the App ID that was created earlier and continue to the next step of the provisioning profile setup (see image below).
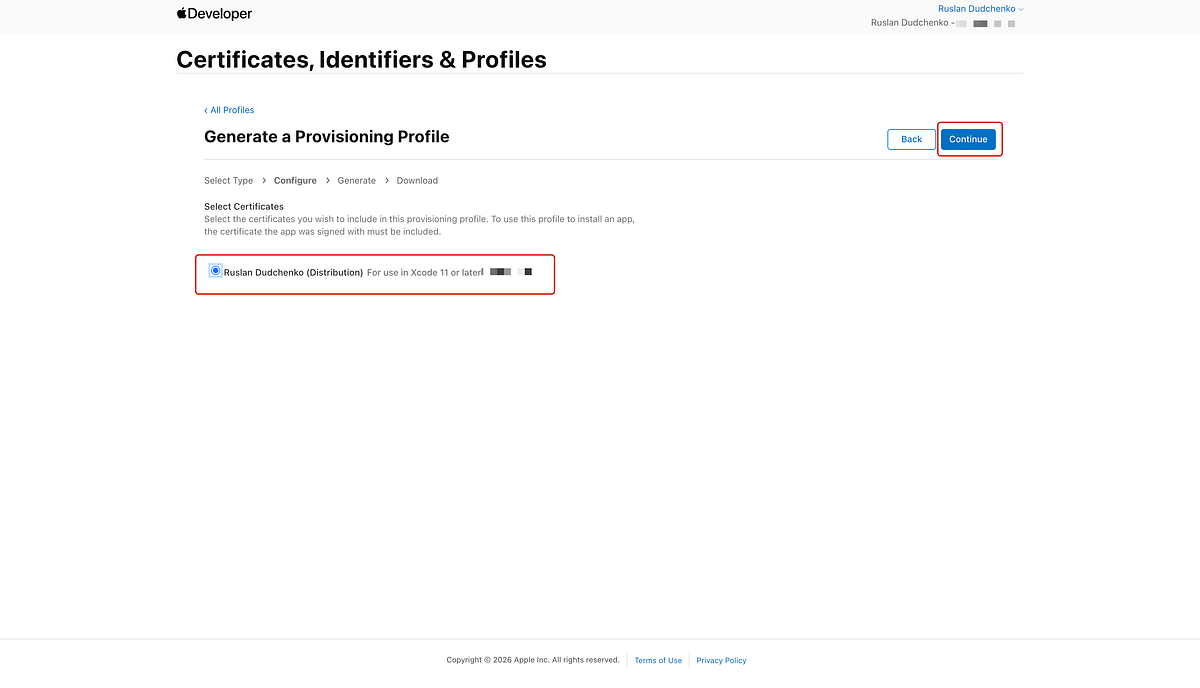
On this page, select the distribution certificate that was created earlier and continue to the next step of the provisioning profile configuration (see image below).
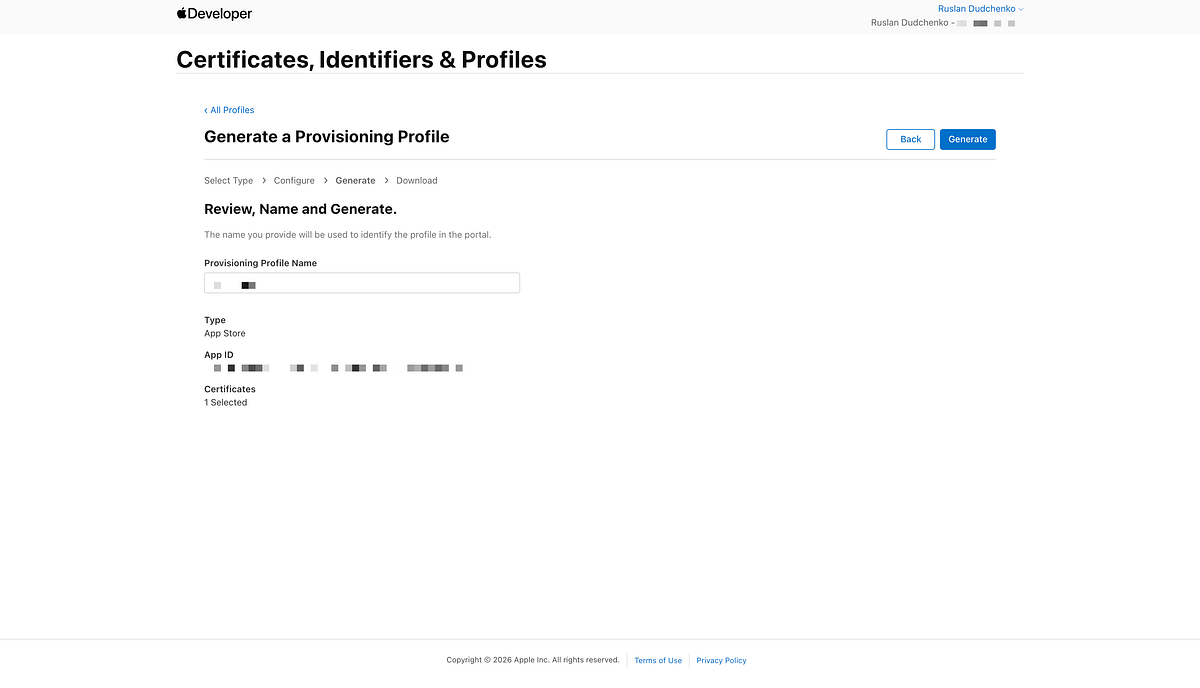
On this page, enter a name for the provisioning profile, then generate it and download the resulting file to your local disk for later use in the build process (see image below).
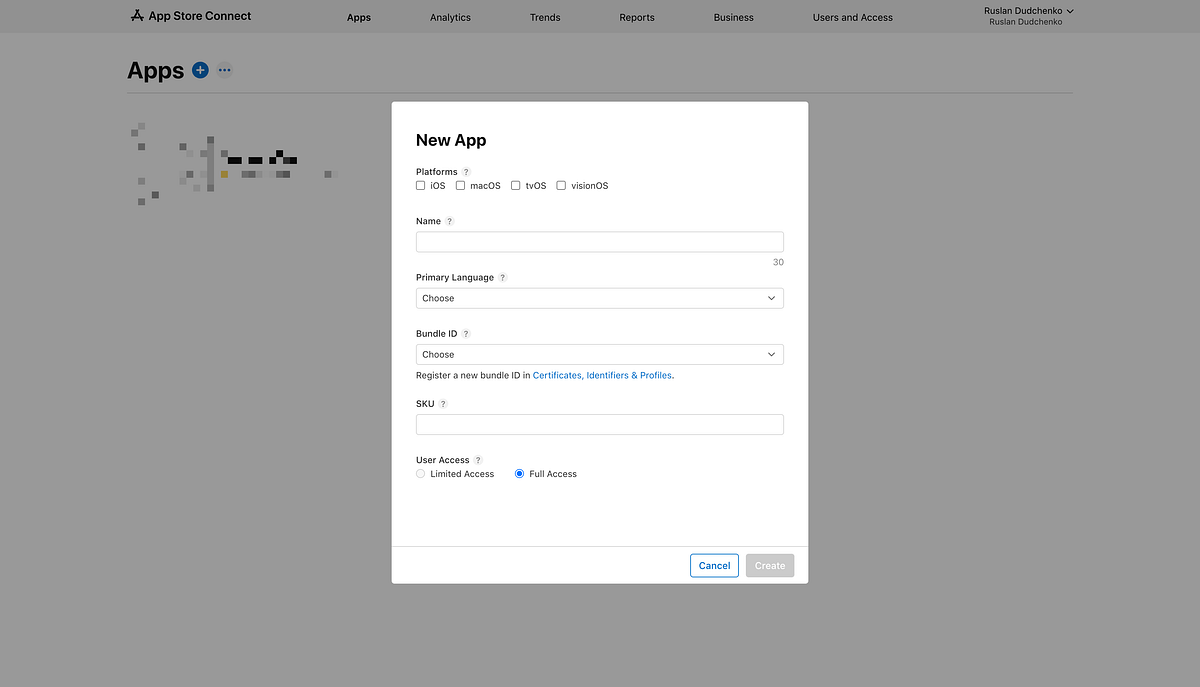
Creating an App in App Store Connect
One final important step is to create the application entry in App Store Connect. To do this, open App Store Connect from your Apple Developer account and navigate to the Apps section to begin the app creation process (see image below).

Fill in all the required information in the app creation form and select the App ID that was created earlier to associate it with the application (see image below).
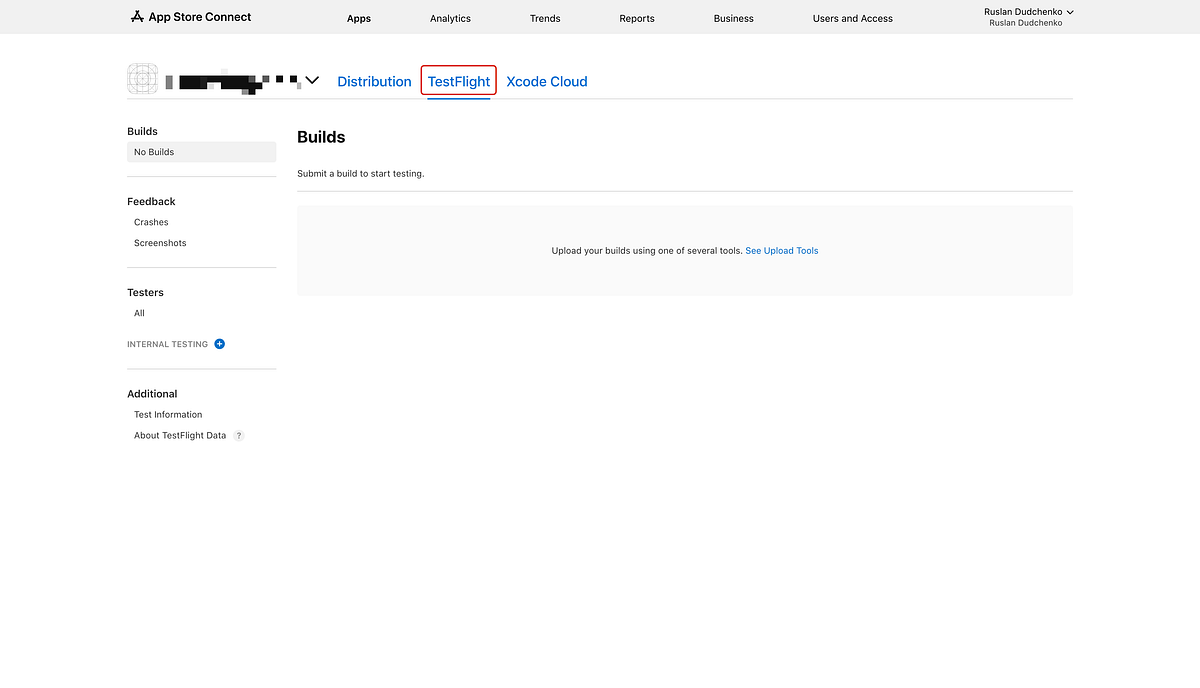
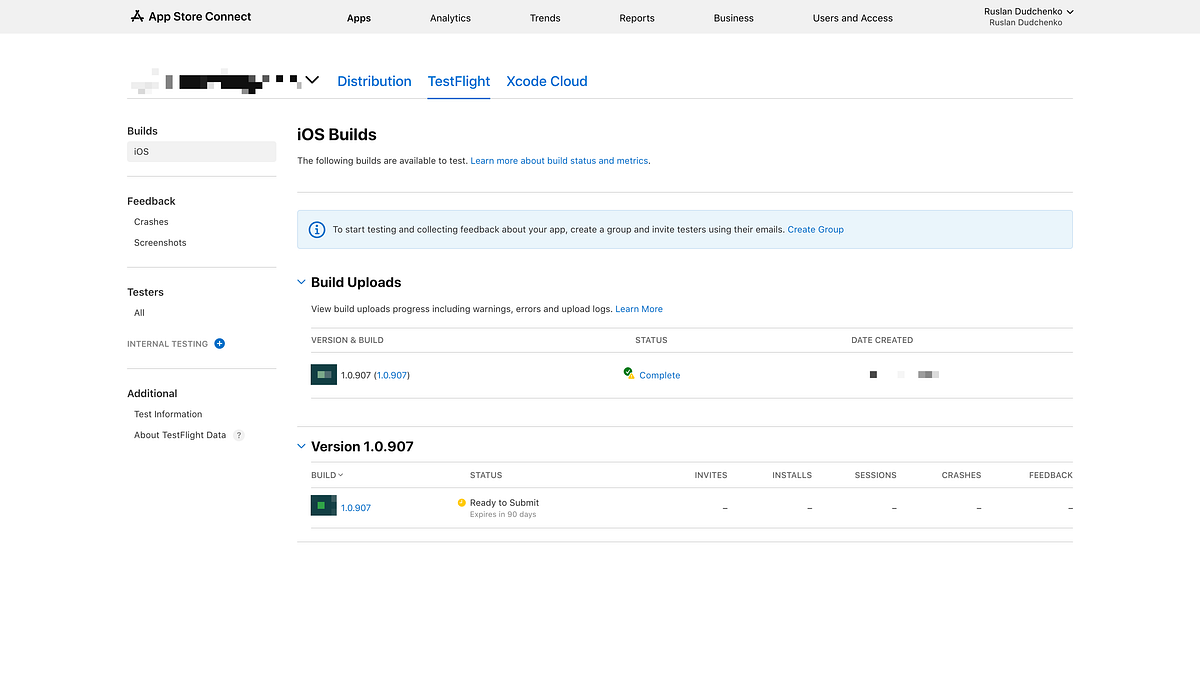
The builds produced and uploaded by the Azure DevOps pipeline will appear in the TestFlight tab of the application in App Store Connect, where they can be tested and later submitted for App Store review (see image below).
What Is a .p12 File and Why It Is Needed
A .p12 file (also known as a PKCS#12 file) is a secure container that stores both an Apple certificate and its associated private key. This file format is required for automated build environments, because it allows a CI/CD pipeline to install a complete signing identity on a build agent.
The private key inside the .p12 file is created at the moment when the Certificate Signing Request (CSR) is generated. This means that the private key belongs to the machine and user who generated the CSR. Apple never stores or recreates this private key — it exists only on the local system where the CSR was created.
Because of this, exporting the certificate as a .p12 file is a critical step before using the certificate in Azure DevOps or any other CI/CD system.
When You Already Own the Private Key
If you generated the CSR yourself, the private key already exists in your local Keychain Access. In this case, exporting the .p12 file is straightforward and fully under your control.
This is the most common scenario when setting up signing from scratch or when migrating an existing project to a CI/CD pipeline.
When the Certificate Was Created by Someone Else
If you joined a project where the distribution certificate was created earlier by another developer, the private key may not exist on your machine. In this situation, you have two valid options:
- Ask the person who originally created the certificate to export and provide the .p12 file
- Create a new Apple Distribution certificate yourself, which will require updating the provisioning profile to use the new certificate and downloading the updated profile
Both approaches are valid. In either case, once you have access to a .p12 file, the next steps in the pipeline setup remain the same.
Exporting the Distribution Certificate as a .p12 File
To export the certificate, first make sure that the distribution certificate is installed on your macOS system. You can do this by double-clicking the downloaded .cer file so that it appears in Keychain Access.
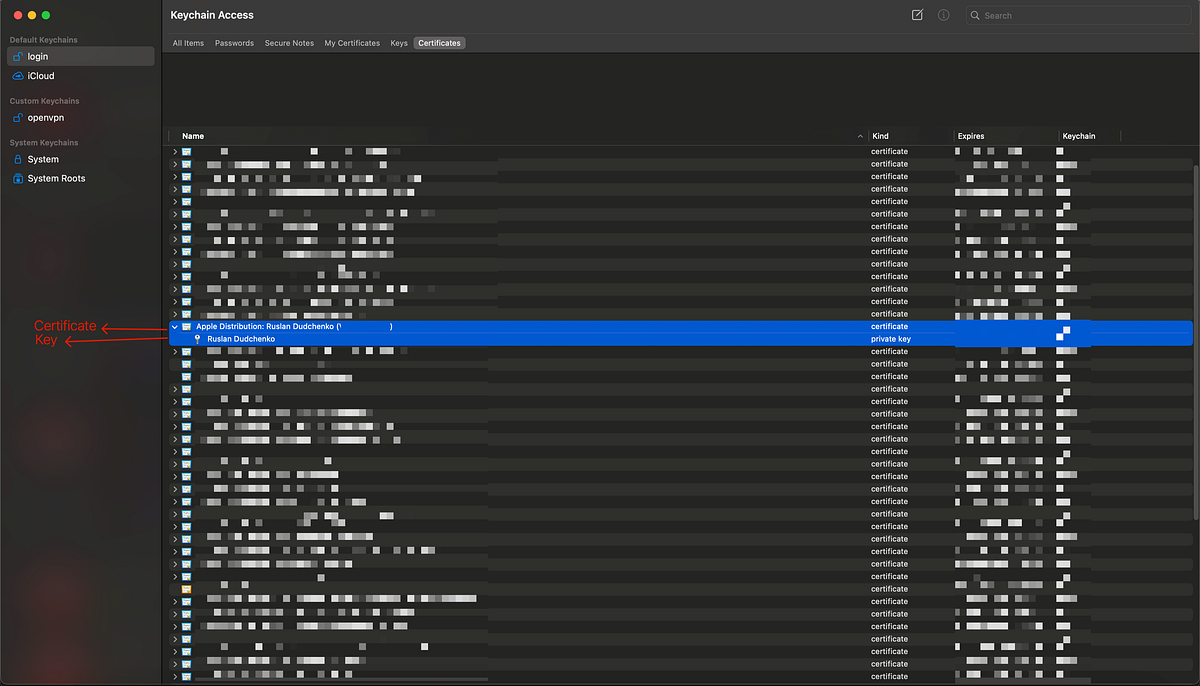
Open Keychain Access and locate the Apple Distribution certificate in the appropriate keychain. Expand the certificate entry to ensure that the private key is present beneath it. Both the certificate and the private key must be selected together (see image below).
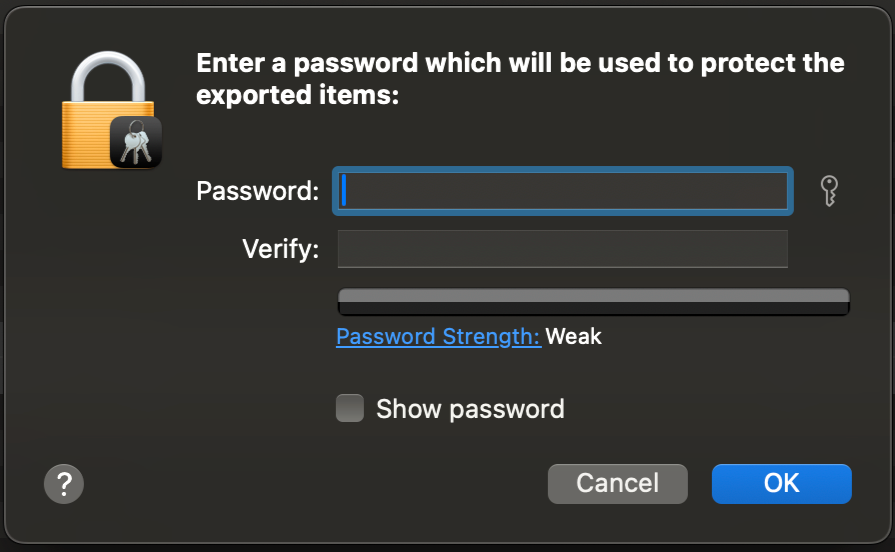
After selecting both items, choose Export, specify a password for the .p12 file, and save it to disk (see image below). This password will later be required by the Azure DevOps pipeline when installing the certificate on the build agent.
The resulting .p12 file is the artifact that will be uploaded to Azure DevOps as a Secure File and used during the signing step of the iOS build.
Configuring Apple Service Connection in Azure DevOps
To allow the pipeline to upload builds to Apple App Store, we now need to create a Apple App Store service connection in Azure DevOps. This service connection defines how Azure DevOps authenticates with Apple App Store when the pipeline runs.
The configuration starts in Azure DevOps under Project Settings → Service connections (see picture below). From there, we create a new service connection and select Apple App Store as the connection type. If everything is set up correctly, Apple App Store will be available in the list of supported service connections.
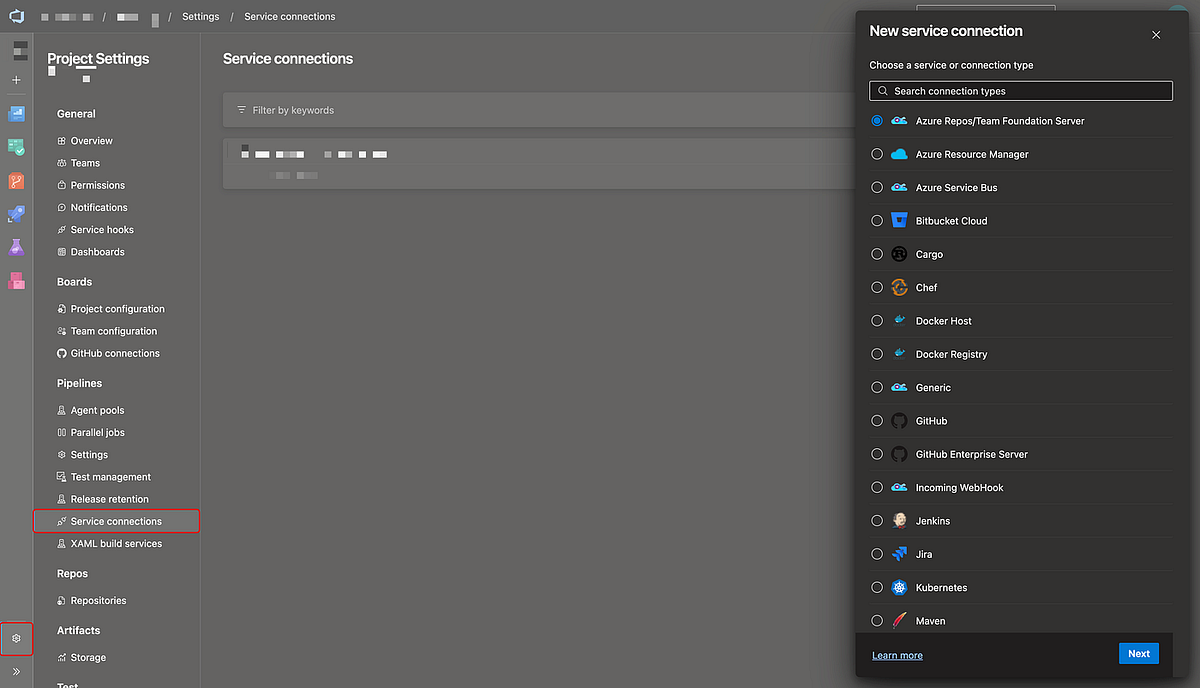
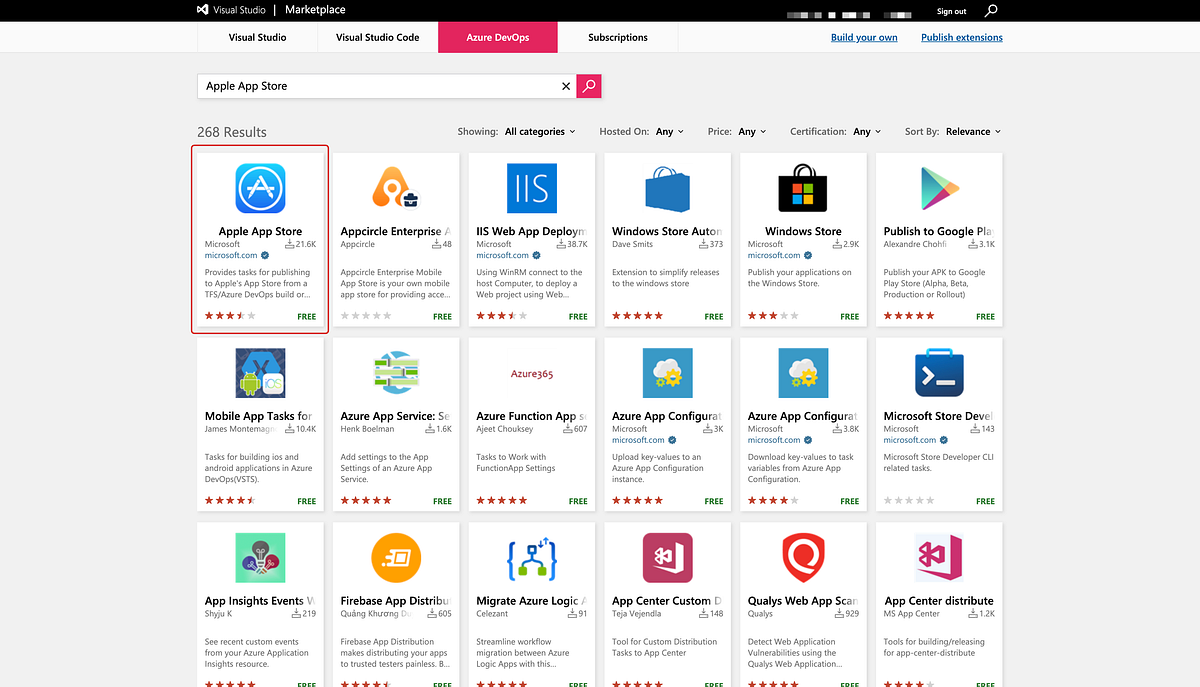
If Apple App Store does not appear in this list, it means the required integration has not been installed yet. Apple App Store support is provided through an extension from the Azure DevOps Marketplace. In this case, you need to open the marketplace and install the Apple App Store extension before continuing. The extension is available here: you can open the marketplace by the next link: https://marketplace.visualstudio.com (see screenshot below)
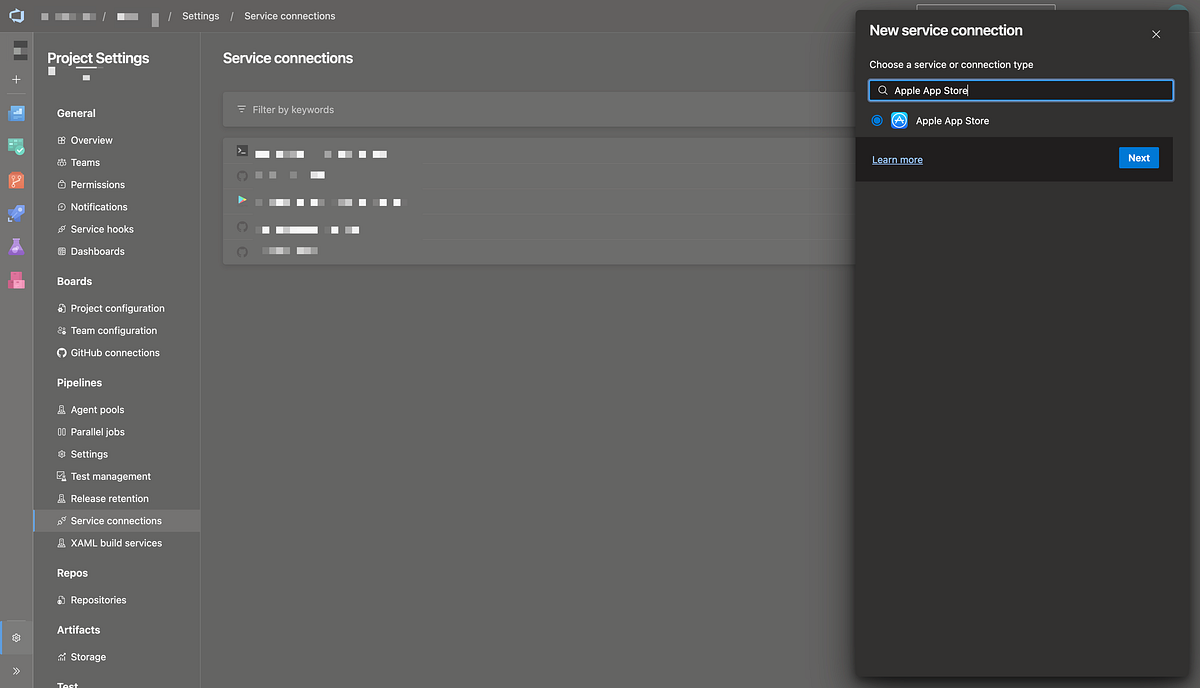
After the extension is installed, returning to the service connections page will show Apple App Store as an available option (see image below).
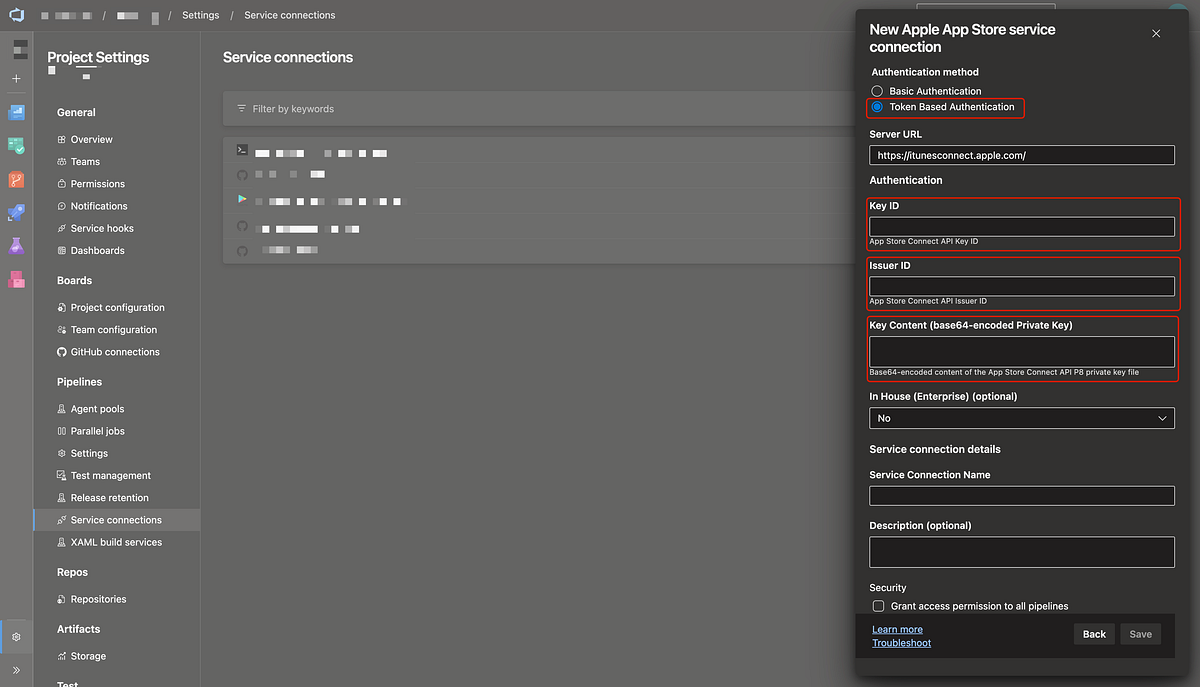
In the form of service connection creation, select Token Based Authentication. You need to insert Issuer ID, Key ID and Base64-encoded Private Key (see image below). More about how to get those in next section.
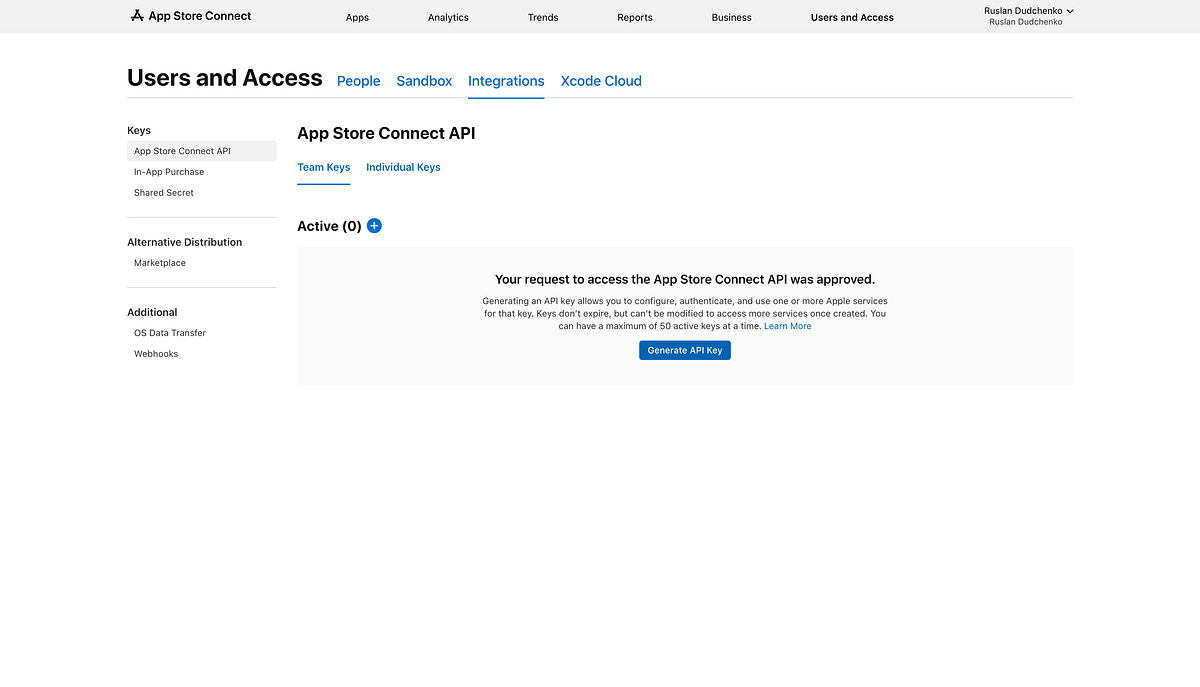
Creating an App Store Connect API Key
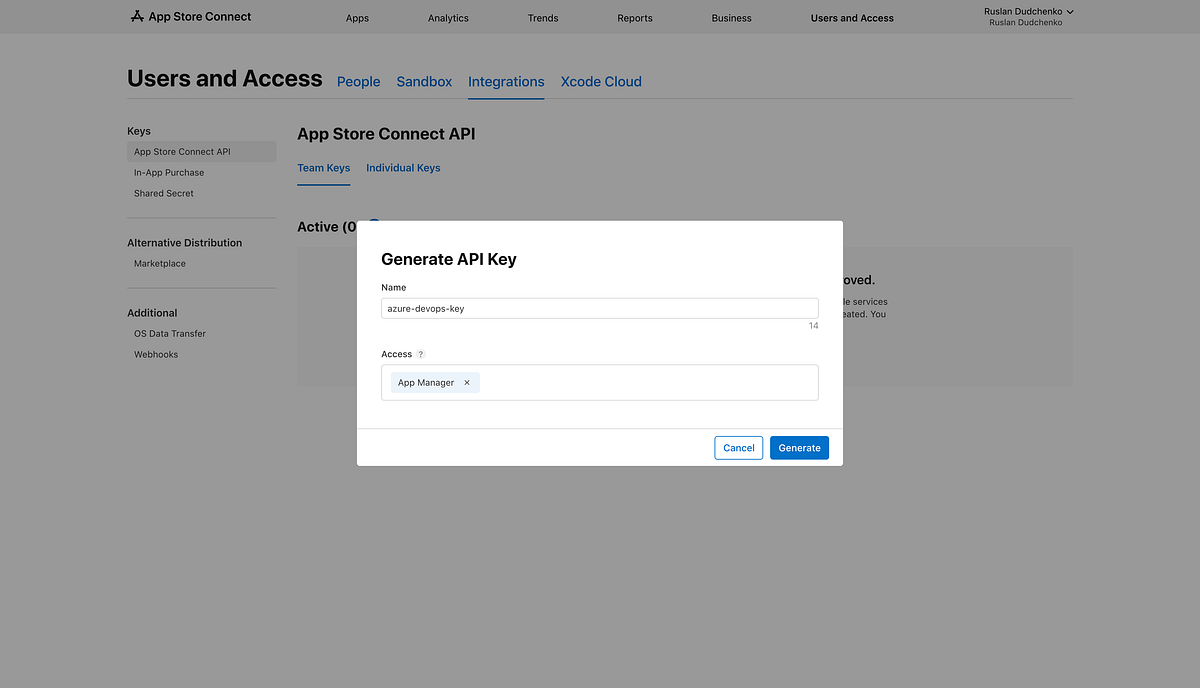
To configure the Apple service connection in Azure DevOps, we first need to create an API key in App Store Connect. Open App Store Connect, navigate to Users and Access, switch to the App Store Connect API section, and open the Integrations tab. From there, create a new API key (see image below).
In the key creation form, enter a descriptive name and select the App Manager role (see image below). This is the minimum role required to allow Azure DevOps to upload build artifacts to TestFlight and manage app distribution.
After the key is created, download the private key file (AuthKey.p8). Apple allows this file to be downloaded only once, so make sure to store it securely, as it cannot be retrieved again later (see image below).
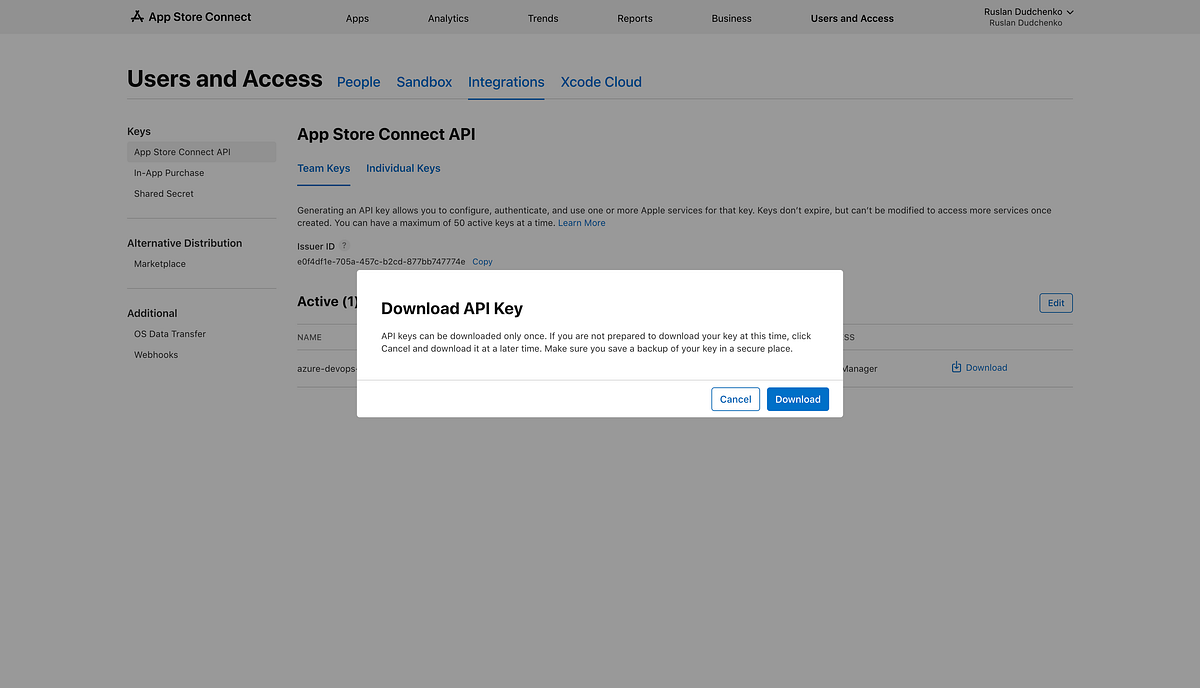
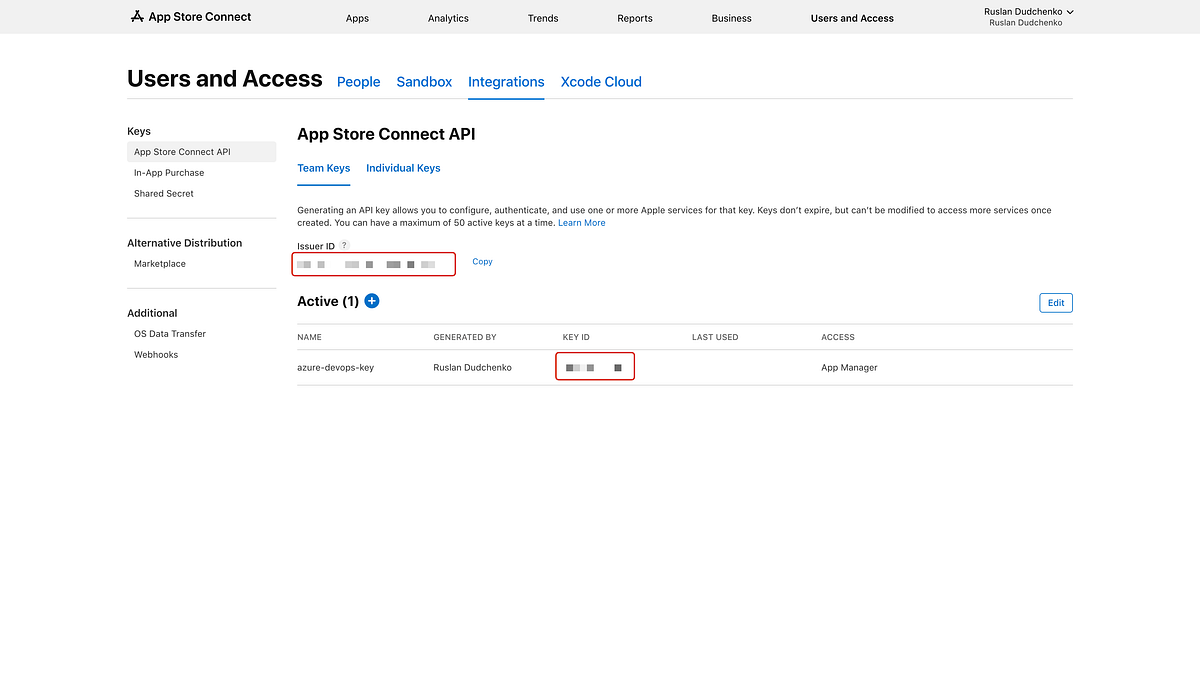
Once the key has been created, you can also copy the Key ID and Issuer ID from the same page. These values, together with the Base64-encoded contents of the .p8 file, are required when configuring the Apple service connection in Azure DevOps.
After downloading the API private key, it must be converted to Base64 format before it can be used in Azure DevOps. Azure DevOps expects the private key content to be provided as a Base64-encoded string rather than as a file.
On macOS, this can be done using the terminal. Navigate to the directory where the downloaded AuthKey_XXXX.p8 file is located and run the following command:
The command will output a Base64-encoded string to the console. Copy the entire output and store it securely. This value will be used in the Apple service connection configuration in Azure DevOps as the Base64-encoded private key.
Once you have the Issuer ID, Key ID, and the Base64-encoded private key, all required credentials for the Apple service connection are available, and the Azure DevOps pipeline can authenticate with App Store Connect to upload builds to TestFlight.
Note that the Base64 value should be copied exactly as printed, without additional spaces or missing characters.
iOS Build, Versioning, and TestFlight Upload Pipeline
Now that all required Apple-side configuration is complete, we can move on to the Azure DevOps pipeline itself. The pipeline shown below is responsible for building the iOS application, applying versioning, signing the build, and uploading the resulting artifact to TestFlight.
The application version is composed using the baseVersion pipeline variable and the automatically generated $(Build.BuildId) value. The baseVersion variable defines the major and minor version of the application, while $(Build.BuildId) ensures that every pipeline run produces a unique build. The same version format is also reflected in the pipeline name: name: 1.0.$(Build.BuildId).
During the pipeline execution, the version values are updated directly in the project file. Both <ApplicationVersion> and <ApplicationDisplayVersion> are set to $(baseVersion).$(Build.BuildId), ensuring that the application version used during the build matches the version uploaded to TestFlight.
In addition to updating the project file, the pipeline updates the iOS bundle version values in Info.plist. The CFBundleVersion and CFBundleShortVersionString fields are updated using the ios-bundle-version@1 task, which derives its values from $(Build.BuildId) and $(baseVersion). This step is required because iOS enforces a strictly increasing bundle version for every uploaded build.
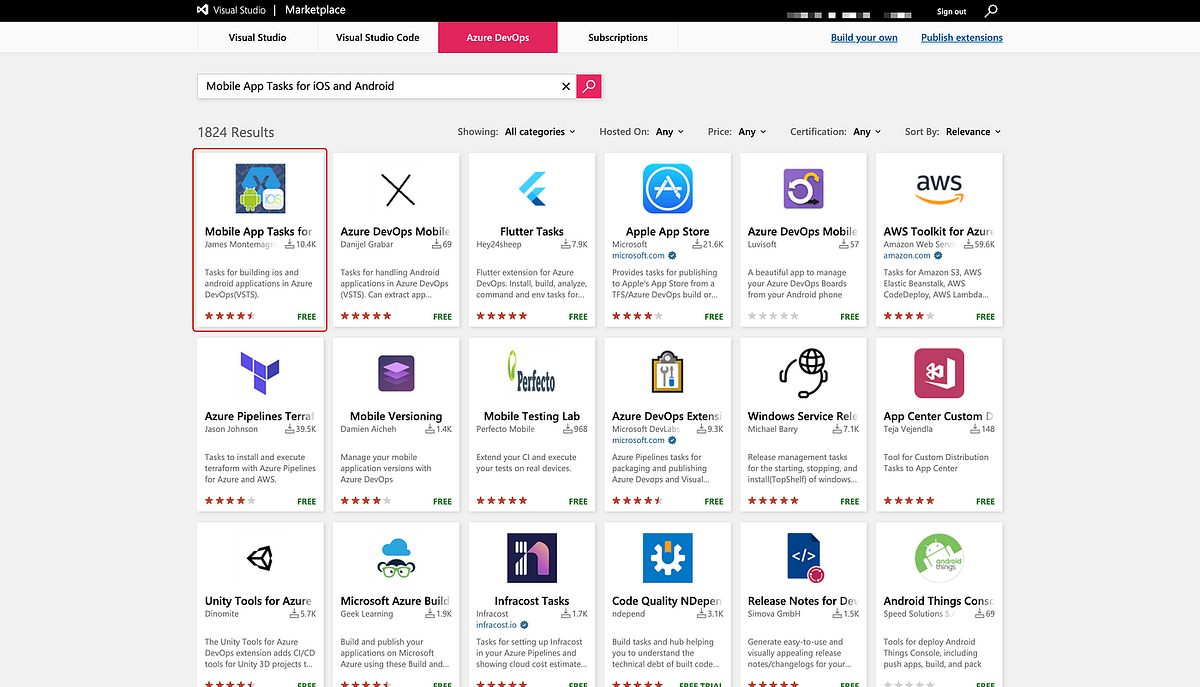
The ios-bundle-version@1 task is not included in Azure DevOps by default. It is provided by the Mobile App Tasks for iOS and Android extension by James Montemagno, which must be installed from the Azure DevOps Marketplace before the pipeline can run successfully (see the image below).
After the build completes, the signed .ipa file generated by the pipeline is published as a build artifact from $(Build.ArtifactStagingDirectory). Publishing the artifact makes the signed build downloadable directly from the Azure DevOps build page, which is useful for verification, troubleshooting, or manual distribution if needed.
The pipeline runs on a macOS build agent using vmImage: macos-latest, which is required for iOS builds and access to Xcode. Before selecting a specific Xcode version, the pipeline prints the contents of the /Applications directory. This step makes it possible to see which Xcode versions are installed on the hosted agent. When upgrading to a newer version of .NET or targeting a newer iOS SDK, it is often unclear which Xcode versions are available, and without this step, it can take several failed pipeline runs to find a compatible setup. Listing the installed Xcode versions helps select the correct one explicitly and reduces trial-and-error during pipeline configuration.
Finally, the pipeline uploads the signed build to TestFlight using the AppStoreRelease@1 task and the configured Apple service connection (apple-store-service-connection). Once the upload completes, the build becomes visible in App Store Connect under the TestFlight tab, where it can be tested and later submitted for App Store review.
iOS Release Configuration in the MAUI Project
The iOS Release configuration in the .csproj file defines how the application is built for TestFlight and App Store distribution. The <ApplicationId> must match the App ID registered in Apple Developer and App Store Connect, as this identifier is used to associate builds with the correct application.
The <RuntimeIdentifier> is set to ios-arm64 to target physical devices, and <ArchiveOnBuild> enables creation of a distributable archive required for producing a signed .ipa. The <MtouchLink> option is configured as SdkOnly to reduce the application size while keeping the build stable (listing below).
Configuring the Pipeline in Azure DevOps
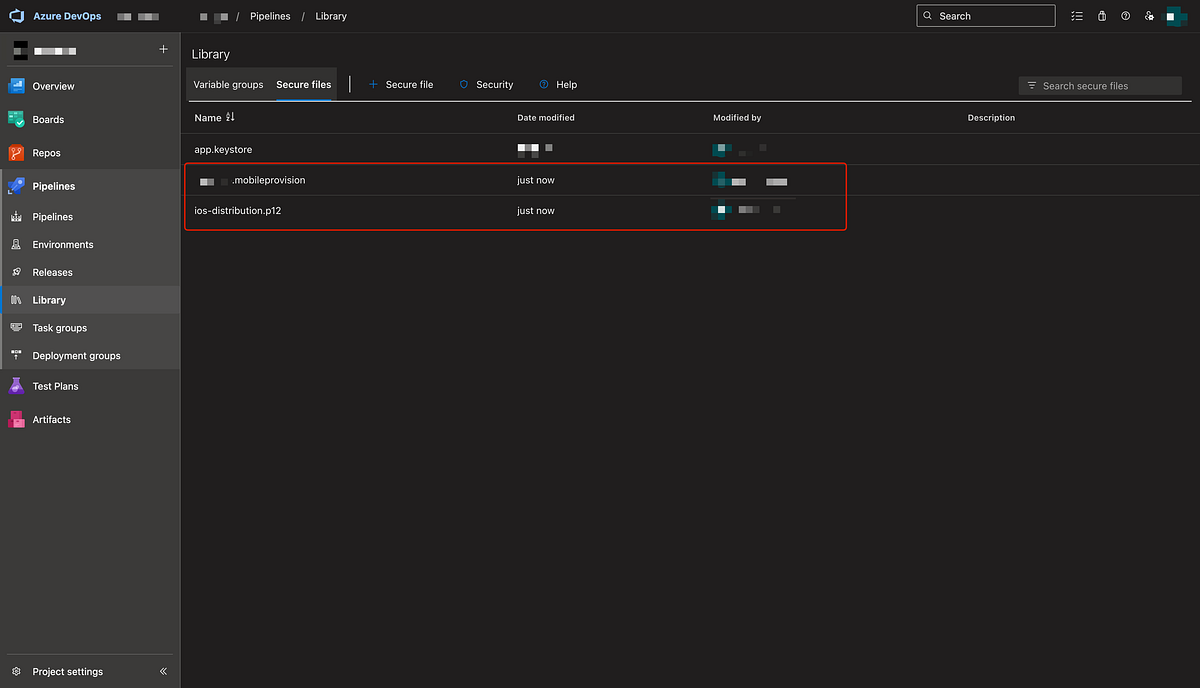
With the YAML file prepared, we can now set up the pipeline in Azure DevOps. The first step is to upload the iOS signing assets. Upload the provisioning profile and the .p12 distribution certificate to Azure DevOps as Secure Files (see image below). These files will be installed dynamically during the pipeline run and are not stored in the repository.
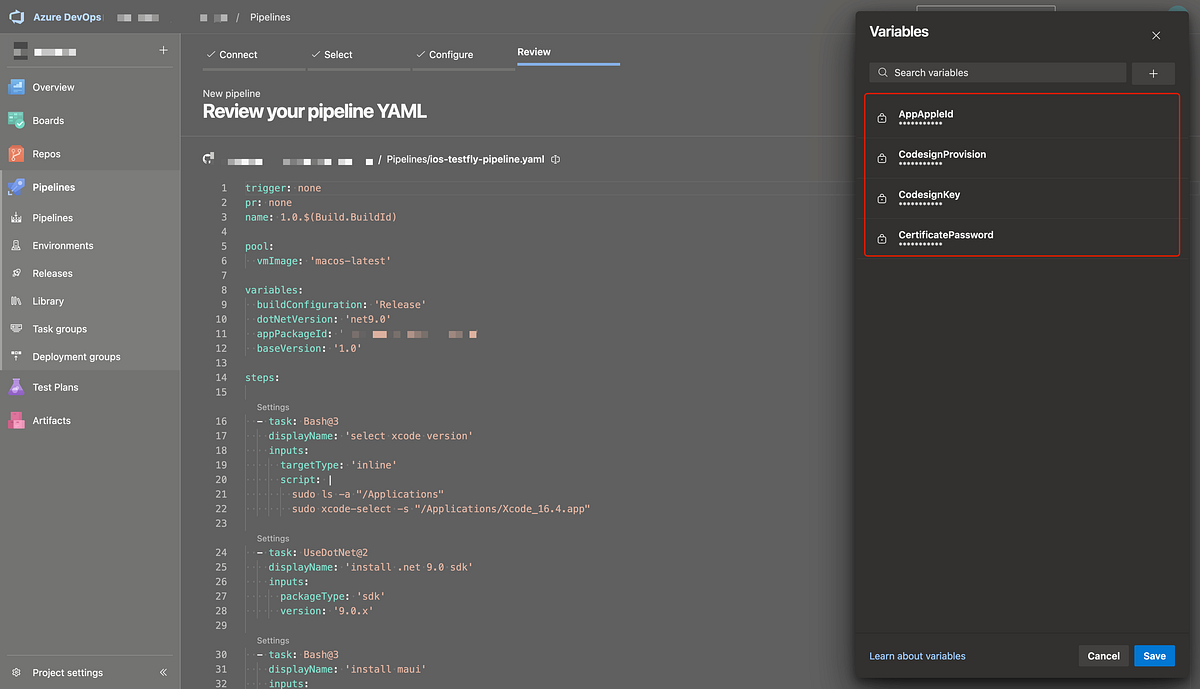
Next, create a new pipeline using the YAML file from the repository and configure the required pipeline variables. Set CertificatePassword to the password used when exporting the .p12 file. Set CodesignProvision to the name of the provisioning profile, which can be found in the Apple Developer portal. Set CodesignKey to the exact name of the Apple Distribution certificate; this value can be copied directly from Keychain Access, as shown in the image below.

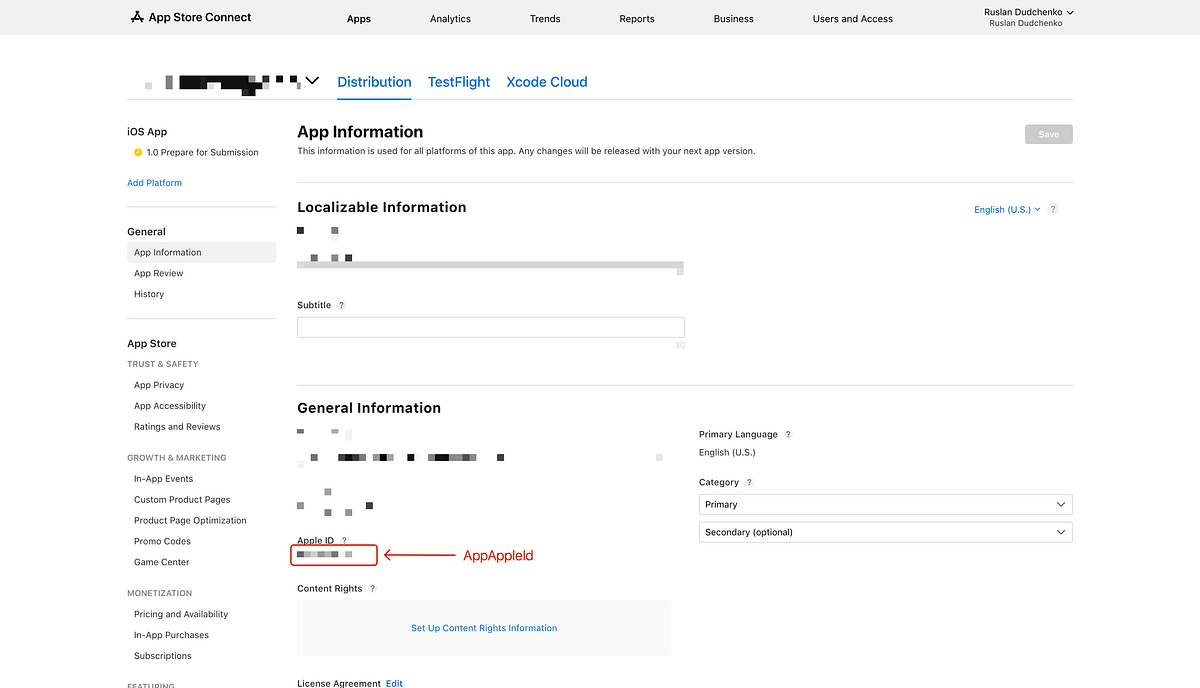
Finally, set the AppAppleId variable. This is the unique numeric identifier assigned by Apple to the application. It can be found in App Store Connect under the App Information section for the app (see image below). This value is required for uploading builds to TestFlight.
Once all variables are configured (see image below), the pipeline is ready to run. During the first execution, Azure DevOps will prompt you to grant the pipeline access to the secure files. After permission is granted, the pipeline can complete successfully and upload the signed build to TestFlight.
Deployment Result in App Store Connect
After the pipeline execution completes, the uploaded build becomes visible in App Store Connect under the TestFlight tab of the application. From there (see image below), the build can be distributed to internal or external testers for validation. Once testing is complete, the same build can be submitted for App Store review and later released to production using the standard App Store Connect workflow.
Conclusion
I hope this article helps developers better understand how to build and release a .NET MAUI application to the Apple App Store using Azure DevOps YAML pipelines. The approach described here covers the complete iOS release flow, from signing and versioning to automated uploads to TestFlight, and provides a solid foundation for a reliable and repeatable CI/CD setup.
The example project and pipeline configuration used in this article are available on GitHub 💻. You are welcome to explore the repository, run the pipeline yourself, and adapt the setup to your own projects. Feedback, improvements, and alternative approaches are always appreciated.
If you’d like to connect or discuss .NET MAUI, iOS deployment, CI/CD pipelines, or hybrid app development, feel free to reach out to me on LinkedIn 🔗. I’m always happy to exchange ideas or help with real-world deployment challenges.
Thank you for reading, and happy deploying! 🚀